Attention S’mores Lovers: What you Need To Know About Fire Pits

What to Consider When Planning A Fire Pit

By: Lauren M. Liff for Dabah Landscape Designs


The definition of an outdoor space is changing drastically as the years pass; it has gotten to a point where simply having a deck and a grill just won’t cut it. Backyards everywhere are becoming much more detailed and full of “accessories”. From outdoor kitchens to outdoor living rooms complete with fireplaces and detailed stonework designed to look like elegant area rugs. As backyards everywhere are being transformed, the number one fixture being implemented into almost every outdoor design is the fire pit. If you are thinking about adding a fire pit to your outdoor space, here are several things to keep in mind:

1. What is your budget? When planning the design of your fire pit, you want to keep your budget in mind. Fire pits can be all different shapes and sizes and can be made of a variety of materials; the cost of a fire pit can range anywhere from $200.00 and up. If you are building a small fire pit, you can buy the stones and dig the hole yourself or buy a simple fire pit unit from a retailer to keep the cost low. The cost can obviously get increasingly high depending on the sophistication of your fire pit.

2. Will it be permanent or portable? Are you looking for a fire pit that will become the focal point in your yard or do you want to be able to bring the fire pit along with you to a gathering? For a built-in design, the materials should match either your home or other materials in your garden so that everything can flow together smoothly. Portable fire pits come in a wide variety of materials and shapes. There are fire bowls, fire tables and also chimney-style options as well. Whatever style you chose, make sure to use to proper stones and materials for your fire pit to work safely. 

3. Will it use wood or gas? Wood and gas are the most common choices for fueling a fire pit. If you are looking for that all too familiar true fire pit smell, then wood is the way to go – just make sure your fire pit has a screen. If you don’t care if you have that smell or not, or you want a quick starter, you can go with gas or propane. Some of these fire pits have remote start capabilities. The fire from a gas-fueled pit won’t be as hot as a wood fire; you also won’t hear the crackling or get that smoke that comes from a wood fire.

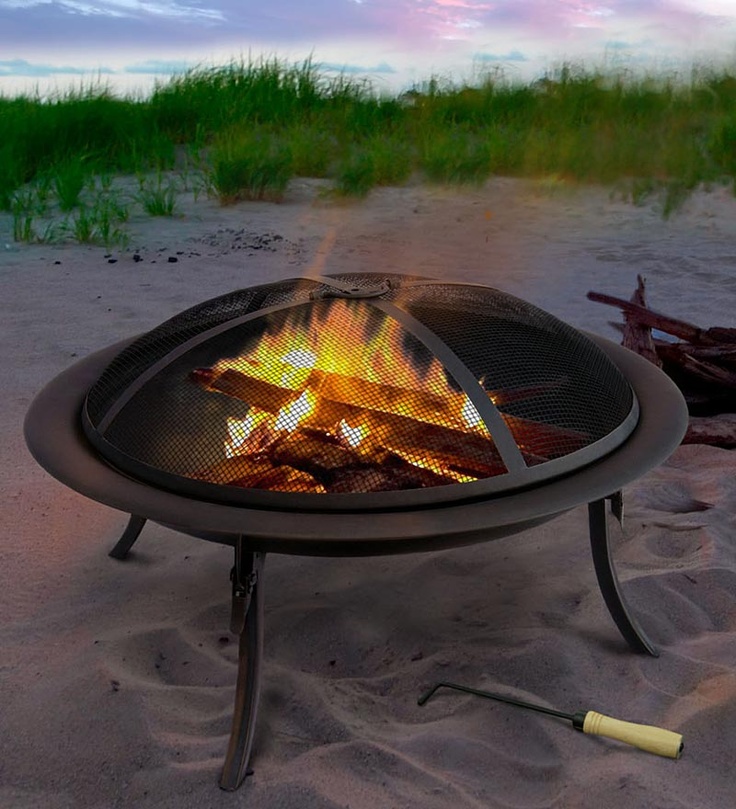
4. Where will it be placed? When placing a portable fire pit, it is best to use it on a natural surface – concrete, stone, grave, or brick (for example) will work fine. Embers could fly from your fire pit and could start a fire if not placed on the proper surface. Permanent fire pits are typically built on a gravel base. The fire pit should be built so that it is proportional to the size of your yard and will allow for seating and proper air circulation. In terms of its location in the yard, most areas have a requirement that the fire pit must be at least 10 feet from the home and neighbors’ yards. Permits are sometimes needed for larger fire pits and some require a site inspection to make sure that the location is safe for a fire pit. Before building your fire pit make sure to check your local ordinances to see what is required.

Whether you decide to build your fire pit with a premade kit from a local retailer or you opt to have a landscape professional design and install it, it’s always important to plan thoroughly before beginning the installation process. When it comes to your fire pit, you want to think “safety” above all else.

Safety Tips:

1. Check wind direction before lighting a fire

2. Don’t use flammable fluids to light/relight fires

3. Don’t ware flammable clothing (nylon) or anything loose-fitting

4. Avoid using soft woods (pine/cedar) – they can “pop” and throw sparks

5. Keep children and pets at least 3 feet away from the fire

Float Like A Butterfly, Sting Like A Bee, Smell Like A Buddleia

Buddleia davidii: The Butterfly Bush

By: Lauren M. Liff for Dabah Landscape Designs


            If butterfly gardens were like kingdoms, the butterfly bush would be the king. Buddleia davidii or, the butterfly bush, as it is more commonly known, is a must-have in any butterfly garden – when it comes to attracting butterflies, it can’t be bested. This beautiful deciduous shrub explodes with blossoms in the late summer and continues blooming into the fall (depending on the weather of course). The butterfly bush is incredibly easy to grow and needs little in the way of maintenance making it the obvious choice for all gardeners from novice to professional.

            Butterfly bushes can grow to be 6 to 12 feet in height with a spread from 4 to 15 feet. These tall shrubs are known for their beautiful long panicles of colorful blossoms. The flowers come in a wide variety of colors included two-tone varieties, however it seems to be the lavender/pink blooms that butterflies enjoy the best. The blossoms provide nectar for many species of adult butterflies, as the leaves are a food source for the larvae of some species. The butterfly bush will thrive when planted in full or part sun and in well-drained soil; planting it in a location that provides these conditions will lessen the amount of maintenance it will require. Keep in mind that the more sun it gets, the more blooms it will have!

            In terms of maintenance, Buddleia does not need a lot of fertilizer – too much fertilizer will promote for foliage growth and lessen flower production. It requires moderate watering and once established it can become drought tolerant – it does not like to have wet feet, too much water will cause root rot. Flowers can be cut so you can enjoy their fragrance in your home and spent blooms can be removed during the growing season to promote additional flowering. The butterfly bush is considered to be slightly invasive so to keep your Buddleia in check, be sure to remove the seed heads in October and prune annually in the spring. Some species can flower on old wood and should only be pruned to maintain its shape and remove dead branches.

            Most of the beautiful flowering plants I see at the nursery and would love to have in my yard are candy for deer – but not the butterfly bush, this beauty is deer resistant! The deer will only dine on Buddleia as an absolute last resort. Butterfly bushes are also not known to have frequent run-ins with diseases or insects either. If the plant is in an environment that doesn’t meet its growth needs, it will become stressed and open to spider mites. Sometimes, but not often, the butterfly bush can be attacked by Japanese beetles, weevils and caterpillars.

            The flowers of the butterfly bush give off a wonderfully soothing fragrance – plant it near a window or patio so you can enjoy its sent throughout the summer months. Aside from being a regular in every butterfly garden, Buddleia can be planted as a back border in a perennial garden, as a massing plant and some dwarf varieties can be used as a front border or an edging plant.  The butterfly bush is also surprisingly tolerant of urban pollution so they can successfully be used in city landscapes as well as along roadsides. Not only are butterfly bushes incredibly attractive on their own, but covered in butterflies outside your window with their fragrance filling the air? That sounds like absolute bliss to me!


https://www.plantdelights.com/blogs/articles/butterfly-bush-buddleia-davidii-plant-buddleja

Guide To Working With The Right Landscape Designer: Part 1

Top 4 Questions To Ask Before Hiring A Landscape Designer

By: Lauren M. Liff for Dabah Landscape Design


         Transforming your property into a beautiful work of art can be an incredibly exciting endeavor and even more so if the entire process goes smoothly. When making the decision to hire a landscape designer you want to make sure you avoid any surprises that may pop up mid-project as much as possible. To avoid such instances, you want to raise the right questions prior to beginning and throughout the duration of your project. Before you even begin your search for a landscape designer, you want to make sure you know what you are looking to have done. It helps to walk around your property and write down a “wish list” so to speak, of projects you would like to have completed. Make a list of projects you yourself would like to complete and which projects you would prefer to have a professional do. Writing out your thoughts and ideas will help give you a clear sense of what you want to have done before speaking to a professional. Once you’ve found landscape designers that you would like to contact, asking the following 4 questions will make sure that you end up hiring the right person for the job.

59531_435118452082_3048215_n.jpg

1. What services do you offer? You want to make sure that the landscape designer you are thinking of hiring can provide you with the services you are looking for. Landscape designers fall into one of three categories: design only, design-build and full service design-build-maintain. Knowing what services a company offers will help you chose the one that is best suited for your project.

2. Can I see examples of your past work? If you are looking for your property to have a certain style, you want to make sure that the landscape designer has worked on other projects with that same style. You want to hire someone who can bring your dream landscape to life and have it be everything you envisioned and more.

3. Is work done in house or is it subcontracted out? It’s always good to find out who is actually going to be completing the project. Some landscape designers use subcontractors for certain aspects of the job such as hardscape installation or carpentry features. It’s best to work with a company who will be in control of every phase of the job – if the landscape designer uses a subcontractor, if that person has a problem it could throw off the entire job.

landscape+design+master+plan.jpeg

4. What is your process? A landscape designer’s process will depend on what services the company offers. Understanding the process of completing your project will allow you to know what to expect throughout the duration of your job. You also want to be honest with the designer about your budget – setting a budget up front is incredibly important because it will tell the designer not that they need to spend the entire budget, but what they can accomplish within the set budget.


         You want to find a landscape designer who can help you to bring your landscape vision to life – someone who can complete the job within your budget without skimping on the creativity. Asking these questions first will give you that leg up on your project and better prepare you for the entire process. A well-designed and maintained landscape can increase your property value by at least 20%. With an investment like that, you absolutely want to be sure you are getting your dream landscape from a design professional who will provide you with exceptional service from start to finish.


Guide to working with the right landscape designer: Part 2


Source

Using Soda In The Garden

coca cola who knew wednesday.png

Share a Coke With Your...Garden?

By: Lauren M. Liff for Dabah Landscape Designs

         Coca Cola is one of, if not the most, popular carbonated beverage of our time. Most people enjoy Coke as a sugary carbonated soda but that is not all it could be used for! Coca Cola actually has a multitude of uses due to its sugar content and low pH level. It can be used as a cleaner for your spark plugs, car engine, toilets and tiles – it can clean up old coins and jewelry as well. It has also been used to relieve the pain associated with a jellyfish sting! With all of these different uses for this hallmark soda pop, could it possibly have any use in the Garden?

         Originally, Coca Cola was derived to cure a Confederate colonel of his ailing addiction to morphine that began after he was wounded during the Civil War. He was initially seeking an alternative pain reliever and his searching led to the invention of Coca Cola. Now, since Coke was originally being used as a health tonic, you might be asking, “what possible use could it have in our gardens?” It turns out that Coke can actually be used to kill slugs! Some gardeners use beer while others use poison, but Coca Cola will work just as well.

wasp-trap.jpg

         Slugs start devouring your garden in the spring before most other insects are even close to causing their own damage. The suspect is easily identified as slugs leave behind a trail of silvery slime wherever they go. They feed on the foliage of your plants; they chew ragged holes into the leaves and can sometimes devour an entire seedling. To use the Coca Cola method to control slugs in your garden, simply fill a low bowl or cup with Coca Cola and leave it in you garden overnight. Just like using beer, the slugs will be attracted to the sugar in the soda and lure them into the bowl. The slugs will then find their way into the sugary drink and suffer a death comparable to drowning in acid. This method works on wasps as well; the homemade wasp trap is similar to your slug trap, you could use a low bowl filled with the soda or even an open can or bottle of Coke will do. The wasps are also attracted to the sugar and travel into the container and drown. Coca Cola can also be sprayed on insects (such as cockroaches and ants) as a pesticide.

         If that wasn't enough, Coke can also be used in composting! Again, thanks to the high sugar content of the soda, it attracts the microorganisms that aid in jump-starting the break down process. The acids in the beverage also aid in the breaking down of compost. Pouring Coca Cola into the soil around your acid-loving plants is also said to reduce the pH level due to the acids in the beverage. So not only can you drink this enjoyable soda pop on a hot summer day, you can use it in your house, in your car and in your garden as well! With its nuisance pest control capabilities and its positive addition into your compost, your garden can enjoy this delightful drink as much as you do!


https://www.gardeningknowhow.com/garden-how-to/info/uses-for-coke-in-gardens.htm

Oh Deer! My Garden Is A Buffet!

How To Keep Deer Out Of Your Garden

By: Lauren M. Liff for Dabah Landscape Designs

When I was a child, I adored Bambi just like every other girl I knew. Now as a landscape designer and avid gardener, I find that sweet little Bambi is a destructive creature that devours my landscape each year. As deer populations continue to increase and as more land is being developed, New Jersey residents share in my frustration towards this nuisance pest problem. Deer will eat just about anything vegetative and boy do they eat a lot – and comparable to humans, they become less picky about their menu the hungrier they are.

The average adult male deer can consume more than five pounds a day! So, how do you keep deer from turning your backyard into their new favorite restaurant? The key to keeping deer out of your garden begins with early intervention. Taking preventative measures before the deer move in will prove for better results and keep your hosta safe. There are several different methods of organic and natural deer control to help you protect your landscape when the herd begins moving through.  

The most natural form of deer control is planting specific flowers that deer have been known to specifically avoid. If you are designing your garden and you know that deer are a concern in your area – take the safe route and plant deer resistant plants. Colorado State University says that plants such as Rudbeckia, Daffodils and Virginia creeper. If you are designing your garden and you know that deer are a concern in your area – take the safe route and plant deer resistant plants. Although deer do steer clear of certain plants and there are those that deer do not typically chow down on – keep in mind that if they are desperate enough or if food is sparse, they will eat just about anything. 

Another method of deer control is by using fencing or netting in or around your garden. Fencing is probably the best solution to your deer problems however it is not the most aesthetic and can become pretty pricy to build and install. Typically a deer-proof fence is about 8 feet high and is made of woven wire. It is possible to get away with a shorter fence being that deer are opportunistic feeders as they tend to avoid barriers especially if there is alternative food source. Netting is a safe and humane way to keep the deer out – it works best for small trees. It allows for sunlight and rain but protects them from those pesky deer. 

There are also devices that you can use in your garden to repel the deer and prevent them from wanting to come back to dine on your arborvitae. You could try using a motion-activated sprayer for example. When the device is triggered it shoots out a cold blast of water – the sudden noise and unexpected spray will scare any foraging animal and at the same time teach them to avoid the area in the future. Another option is using an ultrasonic device. This device emits a noise that the deer can’t tolerate. The deer will react negatively to this sound similar to how we would react to someone scratching their nails on a chalkboard – they simply can’t stand it!

Lastly, if those methods do not work or you’d prefer to try a different tactic, there are always deer repellents. Deer repellents can be a spray, dust, granule or anything left around your plant material to keep the deer away. Everyone has a different opinion on which deer repellent is most effective and honestly the best way to find out which one works best in your garden is by trial and error. Deer can also become less deterred by a repellent overtime so what used to work could become less effective over time – this can be remedied by switching up your repellents year to year.

Repellents can range from a bar of scented soap that you hang near your plants to sprays containing the urine of predators (such as coyotes). There also homeowners who make their own deer repellent; there are a huge number of recipes for this type of repellent, but again you have to find which deterrent works on your deer. Repellents do need to be reapplied every so often depending on the time of year and the amount of rain you receive. Some repellents work by making the plant material smell and taste bad so take care when applying it near food crops – if it tastes bad to the deer it will taste bad to you as well. 

When all else fails, or you seem to be stumped on how to keep these pesky critters out of your yard, New Jersey does have a company that uses their own patented all natural environmentally friendly deer repellent. When it comes to keeping deer from dining on your landscape plants, the struggle is very real. I’ve been fighting this battle personally for quite some time; one year the deer must have really been starving because they completely leveled my carpet roses – thorns and all (if you can believe it). Taking action before the deer cause any damage and using one or more of these methods will absolutely help keep your garden plants off the menu! 

https://www.planetnatural.com/deer-repellent/


Look at those neat flowers! Can you Sedum (see-dum)?

Sedum spp and hybrids: Stonecrop

By: Lauren M. Liff

         When it comes to versatility and reliability, sedum is pretty high up there on the list. Sedum ranges in height, habit, garden use, bloom time and color making it a great addition to just about any garden. Some varieties are spreading groundcovers while other varieties are taller and more upright while still others are small enough to be planted in containers and cared for as houseplants. Whether you’re looking for a ground cover to add to your rock garden or a late summer bloomer in your perennial garden – there is a sedum variety to fill almost any position.

         Most of the low-lying flowering varieties will bloom in the spring, as the taller varieties tend to bloom in the late summer or early fall. The low growing varieties are have a spreading/creeping growth habit and the taller varieties can get up to 2 feet tall or more. The blossoms of flowering sedums are star-shaped and bloom in clusters. The flowers range in color: shades of white, red, orange, yellow, lavender and pink – with all the varieties and sedum hybrids, each one is unique. All sedum varieties have thick leaves that grow in clusters around their stems. Some varieties have hairy foliage where as others have leaves that are waxy, some varieties have colorful leaves while others are adorned with light green foliage.

         Even though the varieties of sedum are all different, they are all succulents. As succulents they store water in their foliage, just as a cactus so they prefer to be in well-drained soil and thrive in full sun. Newly planted sedums should be well watered but once they are established they are drought tolerant. Sedums are fairly low maintenance requiring a light layer of compost in the spring each year, division to keep them in check, pruning to keep them healthy and pinching if you prefer to keep them small.

         Sedum can tolerate part sun however this may cause your plant to become leggy and flop over. If this does happen, a cage can be used to keep them upright or pinching the new growth in the spring to promote additional branching – this will also help to keep your sedum on the shorter side. They can be easily divided – in older plants the center of the “clump” will start to die out. To do this, simply divide your sedum into wedge-shaped sections and be sure to replant it in a similar location as to not shock the plant. Sedum cuttings also root rather easily; simply take the cutting and plant it into the soil – with proper watering and an ample amount of sunlight, the cutting will take root in no time! There is no need to deadhead sedums as the spent flower heads are almost as attractive as the blooming flower head – you can cut the whole plant back to the ground after the first freeze (the tops can be composted if you like).

         Sedum attracts a wide variety of pollinators and they are very much adored by butterflies making them the perfect late blooming perennial for your butterfly garden. When used in a butterfly garden or perennial garden, the taller varieties of sedum can be planted amongst coneflowers, rudbeckia and Russian sage. This combination of summer bloomers will give you an extra burst of color later in the season. When using a creeping sedum variety in your rock garden or as a low-lying border, it can be paired with other low growing and/or spreading flowers such as alyssum. With all the different varieties and sedum hybrids, it’s quite easy to find the perfect spot for it in your garden. In your flowerbed, amongst the rocks, on your windowsill or in a planter – sedum is truly one of the most interesting and versatile plants around!

SEFG_0_Sedum_Fulda-Glow-Fuldaglut.1491332060.jpg

Honey: The Confection With Life-Giving Qualities

How Honey Can Improve Your Health

By: Lauren M. Liff for Dabah Landscape Designs

When your child has a scraped knee, you wipe away their tears, clean the wound and apply Neosporin underneath the Band-Aid to sooth it and help with the healing process. Would you ever think to replace the Neosporin with all natural honey? Some people are aware of the benefits of honey but what most people don’t know is that honey does not only have healing properties, but it can also improve your overall health! There are a lot of sweeteners out there but honey is the only one that has life-giving qualities.

Native Americans figured out that honey had to be important if a bear was willing to continuously get stung by bees to retrieve it. Once they had retrieved the honey for themselves they realized that it not only had a great taste but that it was healing their bee stings, scrapes and cuts as well – they used it for colds, to sooth sore throats and to keep animal skin dry overnight. It was given to children to help them fall asleep and women used it as a facemask. Honey was used for just about everything, but its true potential had yet to be discovered.

No one likes having scabs and scars, but did you know that the antibiotic creams you apply to your scrapes end up killing some of the tissue surrounding your cut leaving you with scars?  A clinical trial was done in Calabar, Nigeria where they used unprocessed honey to treat patients with wounds and external ulcers. During this study they found that, in 59 of the cases, honey was more effective than your average antibiotic creams and ointments – they even noticed that infected wounds treated with honey (as a topical application) became sterile within a week where as the regularly used applications applied to sterile wounds simply kept the wounds sterile until they were able to begin healing.  It was also discovered that honey removed dead tissue from persistent wounds – this allows some patients to avoid skin grafts and amputations.

Aside from helping clear up infections and healing wounds without scars – honey also reduces inflammation and soothes the pain of patients with deep wounds and even burns! Dr. Peter Molan (of the Honey Research Unit in New Zealand) said, “It is a very effective means of quickly rendering heavily infected wounds sterile, without the side effects of antibiotics, and it is even effective against antibiotic resistant strains of bacteria.”

As if those life-giving qualities weren’t enough, there’s so much more that honey can do! Certain honeys have shown to assist in the treatment of the Helicobacter pylori bacteria (H-Pylori as it’s more commonly known). Some have found that just a tablespoon of honey twice a day can help sooth the pain of stomach ulcers. Due to the fact that honey enzymes energize the digestive process, you can avoid indigestion! A daily intake of honey can also aid in fighting off fatigue as well as helping your body’s recuperative abilities. Beginning a daily regiment of local honey intake a month before pollen season can help to minimize the symptoms of pollen allergies and hay fever related symptoms – say goodbye to sniffling runny noses! Honey can also be used as a moisturizer to help improve your complexion and ease away those annoying wrinkles. Simply use it as a facemask: splash your face with warm water then apply a thin layer of honey to form the mask and when you’re done just wash it off with some cold water.

It’s remarkable that something that tastes so good has so many incredibly healing properties and can actually improve your overall health. Honey is full of beneficial nutrients such as: potassium, iron, magnesium, calcium and so many more! Honey simply makes everything easier; putting honey under a Band-Aid, for example, softens the skin and dampens the pain of the dreaded Band-Aid removal. Honey can heal your ailments both inside and out; there isn’t a single other sweetener around that can be placed in your kitchen as well as your first aid kit!


http://www.motherearthnews.com/natural-health/health-benefits-of-honey-zmaz99fmzraw

Improving Your Garden From The Ground Up

Soil Amendments: How to Improve Your Soil

By: Lauren M. Liff for Dabah Landscape Designs

            Now that you’ve done your at-home soil pH and texture tests, let’s talk about how we can improve your current soil conditions. The healthier your soil is, the happier your garden plants will be – the amendments you make to your soil of course will depend on what type of soil you have. Using the results from your soil tests we can figure out how to adjust the pH level and how you can improve issues like drainage or lack of organic material.

            As we discussed in the soil test post, there are 4 main types of soil: loam, clay, sand and silt. IF you have loamy soil then there isn’t much you need to do in terms of amending it – just simply keep doing what you’re doing, but regular applications of compost or other organic materials will help your soil to maintain this texture. If you have mostly clay soil, your available nutrients are plentiful however you struggle with drainage – leaving your plants sitting in water. If you have mostly sandy soil, the presence of available nutrients is most likely pretty low and you struggle with water retention as it drains far to quickly. If you have silty soil, it tends to get slimy when it’s wet and drainage is a concern but the presence of available nutrients is high.

            Looking at your soil textural triangle, or the jar from your DIY soil test, you can tell which particle is most predominant. Improving your soil does take time and can be difficult but it is possible by taking the proper corrective measures and with the use of the right amendments.

For sandy soils:

1. To help with water retention you can use well rotted manure or compost (grass clippings, humus and leaf mold as well) – these will increase your soils ability to retain water, they also will work the fastest.

2. You also have to keep an eye on salt levels – if you have a seaside garden then chances are your soil already has a pretty high sale content – in this case make sure you are only using plant based amendments such as plant based compost or sphagnum peat (they have the lowest salt levels).

3. The nutrient content in sandy soils tends to be low, you can test your soil to see what nutrients are lacking and use fertilizer to address those concerns accordingly.

For silty soils:

1.  With silty soils your concerned with drainage and the fact that the roots are not receiving the optimal amount of oxygen. You can use composted manure or vegetable matter or ground/aged pine bark to improve the aeration and drainage.

2. Apply 2 to 4 inches of the organic material and work it into the soil about 8 to 12 inches down (into the root zone) for best results.

 For clay soils:

1. Use compost or other materials that will compost quickly (such as well-rotted manure, leaf mold and green plants) Apply 3 to 4 inches of the organic material on the soil and gently work it into the soil, go down about 4 to 6 inches.

2. Pay attention when watering your plants, if your soil is mostly clay the water will sit on the soil and some plants can’t tolerate wet feet.

3. Builder’s sand and gypsum will also help improve the drainage and break up some of the compaction – make sure you use course sand rather than fine sand because that will only make things worse.

4. Core aeration will also assist in breaking up the compaction by pulling out tiny plugs of dirt that will sit on the ground and disintegrate naturally.

            After completing the DIY soil pH test, you now have a rough idea of what the pH level of your garden soil is. There are two options when it comes to addressing soil pH levels: you can either use plant material that thrive in acidic or alkaline soils (depending on your results) or you can use amendments to lower or raise the pH level. Most plants do well in soil with a pH level between 6.0 and 6.5. Adding organic material to your soil is helpful in adjusting the pH level as well because it acts as a buffer – protecting your soil from becoming either too acidic or too alkaline. But there are other amendments you can use to further adjust the pH level of your soil.

Lowering the pH level:

1. If your soil is too alkaline, the phosphorus in your soil will be less available to your plant materials resulting in less fruiting and flowering.

2. Using organic matters to address this concern is going to be your best bet – composted manure and vermicompost will release the phosphorus that is tied up in your alkaline soil- the use of pine needles as mulch will also naturally increase the acidity in the soil.

3. Sulfur can be used to lower the pH level in your soil and make it more acidic. This is the product used for turning hydrangeas that beautiful bright pink color.

4. Sulfur should be applied using the same method as lime – read the label and follow the directions. If you are using sulfur to increase the acidity in your soil, I have found that working it into the soil is the application method that shows the best results.

Raising the pH level:

1. Lime is typically used to raise the pH level of garden soil to make it more alkaline – make sure to read the label and follow the directions. Adding too much lime to your soil can be incredibly difficult to correct; it’s best to start on the lighter side.

2. You can use powdered or pelletized lime for this application; mix it in to the top layer of the soil or sprinkle it on top and water it in.  In my experience pelletized lime is easier to work with and watering it into your soil, allowing it to work gradually, seems to have the best results.

3. Before doing a lime application you want to check the magnesium content in your soil as lime will increase those levels. Too much magnesium in the soil will restrict the nitrogen availability for your garden plants.

            Amending your soil texture and pH level will greatly improve the health and happiness of your garden plants. The texture and pH level of your soil will effect the availability of the soil nutrients that plants need to grow and flourish – freeing up or adding to these nutrients will help your plants to grow to their fullest potential. Soil is obviously a key element when it comes to the health of your garden – so just as you tend to your plants, tend to your soil as well. Help your garden be all that it can be!


Amending Clay Soils

Amending Sand Soils

Amending Silt Soils

Amending pH Levels

.sqs-block-content h1 { font-size: 80px !important; }