new jersey landscape designers

The Moments That Take Your Breath Away

Tigridia lilacea.jpg

Tigridia pavonia: The Tiger Flower

By: Lauren M. Liff for Dabah Landscape Designs


       Have you ever seen something so beautiful that it literally begged you to stop what you were doing and stare in awe? The Tigridia pavonia is one of those breathtaking flowers that you can’t help but stare at. Known more commonly as the Tiger Flower, it truly is a wonder to behold in a late summer garden. With similarities to the Daylily and Gladiolus, the tiger lily comes in a vast range of colors that can make your jaw drop.

       With brightly colored blossoms sitting atop a slender stem, the Tigridia pavonia can produce several flowers per stalk. The flowers are two-toned with combinations of pink, white, red, orchid yellow or orange and a unique contrasting center point. The flowers can be 3 to 6 inches wide and consist of three large one-color petals surrounding 3 small spotted petals. These smaller petals surround a similarly patterned center cup.

FD10488WH.JPG

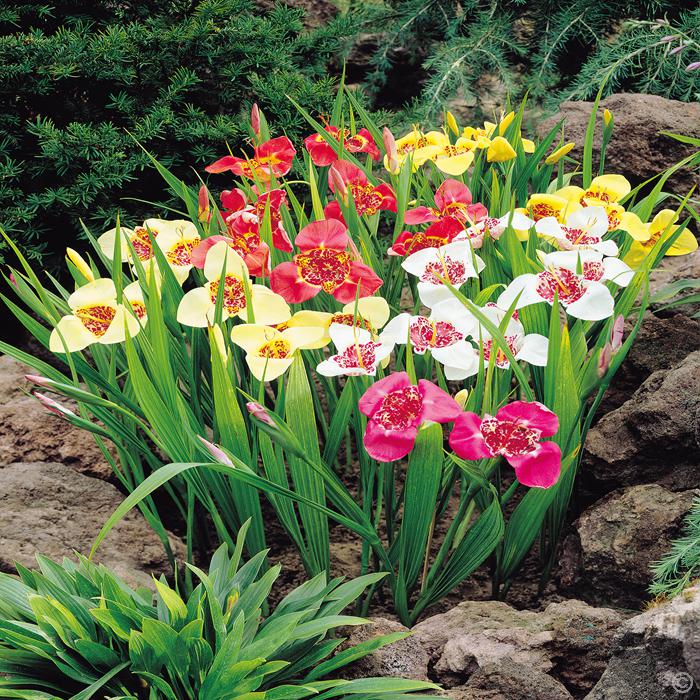
      The stems are surrounded by sword-shaped leaves that stand upright similar to that of Gladiolus. The interesting characteristic about these delicate blooms is that that they only bloom for a single day. However, since the Tiger Flower produces multiple blossoms per stalk, the flowering period technically can last up to several weeks. You can also cut back the first flowers about six inches down the stem to aid them in re-blooming.

       Tigridia will thrive in areas with well-drained soil and full sun. It has been known to tolerate part shade in a hot climate area. Once established, the Tiger Flower is drought tolerant and deer resistant. It can be used in the landscape as a border or a massing plant; you can also put them in containers as an exotic accent piece. The stems are delicate and the foliage is light so planting it among low-growing plants or groundcovers will work the best.

img_5945.jpg

       The bulbs should be planted in the spring and it’s recommended to plant 3 bulbs to a group for that extra impact. When planting these bulbs, set them 3 inches into the soil and about 5 inches apart – make sure to water well throughout the season. For such an astonishing plant, they are incredibly easy to grow! The bulbs do produce offsets and will eventually form a large clump. You can divide them every 3 years or so to keep them maintained.

       The beauty of this flower is enough to make your heart skip a beat, seeing it in bloom is like falling in love at first sight. For a plant as beautiful as this, its hard to believe that it’s so simple to grow and virtually maintenance free! Turn your already beautiful garden in to a showstopper by planting these bulbs next spring. Your garden will surely be the talk of the town, especially during the end of the season after the early and mid season bloomers have faded – the Tiger Flower is absolutely the diamond in the rough!

mexican-shell-flower1-400x326.jpg
tigridia_grandiflora_b8f44059-c3ec-4868-9978-e875144d0032_1024x.jpg
Tigridia_pav_Sunset_in_Oz.jpg


Organic Hacks To Improve Your Garden

organic-gardening.jpg

Hacks That Will Forever Change How you Garden

By: Lauren M. Liff for Dabah Landscape Designs


Every gardener has their own handful of tips and tricks and by sharing these neat hacks – gardens everywhere are reaping the benefit. There’s the “by the book” way of gardening and then there’s the back road “unorthodox” way. I’ve found that most of these little tricks that work better that the step-by-step instructions from Gardening For Dummies. We’ve selected 5 organic gardening hacks that will not only change the way you garden but better your garden all together:

1. Save your coffee grounds! Believe it or not, coffee is for more than just giving your body a jump-start. Rather than throwing away your coffee grounds, save them for your garden. They are an amazing organic resource and provide nitrogen to your compost as well as assisting in improving your soil structure. If you are adding your grounds to a compost pile, combine it with equal amounts of leaves and grass clippings. When adding coffee grounds to a static compost bin, combine it with a carbon source (such as shredded paper or dry leaves) in equal amounts. For both composting methods make sure to mix the components together for the best results. If you are adding coffee grounds to your soil, make sure the soil is wet and apply a nitrogen fertilizer simultaneously. Coffee grounds in your soil will encourage microorganism growth. It has also been found that coffee grounds in the soil can also repel pests such as snails and slugs while at the same time attracting earthworms.

Egg-Shells-Soil-PLant.jpg.838x0_q80.jpg

2.  Save your eggshells! If you place crushed eggshells around your garden plants and vegetables, this will help deter slugs and will take your plants off their lunch menu! There really is no science behind this little hack; it’s simply that slugs do not like sharp edges as their soft bodies could easily be punctured. If you notice the obvious slime trails on your vegetative materials, its time to break out the eggshells (pun intended)!

3.  Epsom salt for your tomatoes. Epsom salt has multiple health and beauty benefits for us, but who knew that it could be useful in the garden? Epsom salt is actually a naturally occurring mix of sulfate and magnesium. So when adding Epsom salt, in small quantities, to your tomatoes, can actually help the plant develop better fruit! Magnesium and sulfate are important ingredients when it comes to plant growth. It has also been found that adding Epsom salt around stressed plants can actually help them to recover.

stem-cutworm.jpg

4.  Aluminum foil comes in handy! Every gardener is concerned about crawling pests when it comes to their vegetable gardens. Simply wrap a collar of aluminum foil around your tomatoes or squash – this will help deter these pests and prevent them from tasting your vegies before you even get the chance. Again, there is no science behind this hack; most crawling insects are not fond of moving across metal surfaces. The foil also acts as a physical barrier, preventing stem-harming pests such as borers from attacking your plants.

5. Baking soda is a multipurpose product! Baking soda can also be used in the garden as an organic fix for fungal diseases. The sodium bicarbonate properties in baking soda actually act as a natural fungicide. All you need to do is take 1 teaspoon of baking soda and dissolve it in 4 cups of water, add a few drops of liquid dish soap (so the solution can stick to the plants). Spray this solution on plants to prevent fungal diseases like powdery mildew, rust and black spot. This method can be repeated ever week to two weeks (or after rainfall).

There are so many garden hacks out there that can make your gardening experience easier and your garden happier. These hacks are heard mostly by word of mouth, so if you have any hacks of your own, please share them on our Facebook. We can all benefit from anything and everything that will make our lives better and easier. Happy gardening!

More Garden Hacks

Guide To Working With The Right Landscape Designer: Part 3

Top 4 Questions To Ask About Your New Landscape

By: Lauren M. Liff for Dabah Landscape Designs


Congratulations on your newly installed landscape! You asked the right questions before hiring your landscape designer and you asked the right questions during the project but now that the project has been completed, what’s next? Every landscape design client has questions regarding their new plant material and hardscapes. We believe that there is no such thing as a silly question, so ask away! As landscape designers, we want to see your new design flourish for years to come.  Here are the top questions we recommend you ask regarding your new outdoor space:

Top: Initial Installation, Bottom: 1 year later

Top: Initial Installation, Bottom: 1 year later

1. How long will it take for the garden to fill in? When a new garden is installed, the plant material used seems to look small but there is a reason for that. Designers take into account the mature size of the plant and plan for the space it needs to grow. Each plant has a different growth rate, some ornamental grasses and perennials can grow in within a single season but larger woody material such as trees and shrubs can take some time to fill in. We can say that the year following your landscape installation will absolutely look more incredible than it did when it was first installed. Be sure to ask your designer how long they believe it will take for the areas in your landscape to grow in, that way you will have an estimated timeline.

unnamed.jpg

2. How much maintenance do my new plants require? Different plants require different levels of maintenance and maintenance depends on how much time you are willing to commit to your garden. Some companies offer maintenance services which are at your disposal and if they do not offer those services, you can ask for recommendations. For “the do it yourselfers” make sure to ask about the maintenance requirements for the plant materials used on your property. Proper maintenance and care results in happy, healthy and well-established plants.

unnamed.gif

3. When and how often should I water my new plants? Similar to maintenance practices, watering routines vary from plant to plant. Some like wet feet, others prefer dry soil and some are in between. Request the watering requirements for your plant materials from your designer – this will help to ensure their success going forward. If you do not have an irrigation system, ask if they would recommend having one installed or for suggestions on alternative watering methods. Make sure to ask how often you should water – typically the best time to water your garden and turf is early in the morning and around dusk. New plants do require more water as opposed to plants that are already established.

unnamed-1.jpg

4. How do I handle weeds in my new garden? Weeds are an incredibly common problem in every garden and they can take away from the beauty of the design. You can ask your designer for recommendations on how to control them. From our standpoint, preventative measures work the best – there are pre-emergent weed control applications that you can apply in your garden (organic as well). Although it seems like a lot of work, pulling weeds out as they appear will help to keep your garden in top shape.


Working through a landscape design and installation process can be difficult…but it doesn’t have to be. When it comes down to it, asking the right questions at the right times will make all the difference! Using our simple to follow 3 part guide will absolutely make your project go smoothly and your experience much more relaxing and enjoyable. Being on the same page as your designer, not holding in any questions you might have and gaining knowledge about your landscape will help you to keep your garden in tip top shape for many years to come! 


http://www.foxnews.com/real-estate/2017/04/07/10-questions-to-ask-before-hiring-landscape-designer.html

How to Build Your Own Fire Pit

build-a-fire-pit-hero.jpg

DIY: Building a Fire Pit

By: Lauren M. Liff for Dabah Landscape Designs

Now that you know what to consider when building a fire pit, lets talk about an easy DIY project to build one! There’s a great satisfaction that comes from using something that you built yourself, especially something as wonderful as a fire pit that. Even though it may seem small, it can make a big impact on your outdoor entertainment experience.  You can refer back to our previous fire pit post for a list of things to consider before beginning this project.


Here is what you will need:

Cast concrete wall stones

Gravel base

Construction Adhesive

Edger

Fire bricks

Level

Tamper

Steel rake


Let’s get started!

1. Pick a safe location to build your fire pit, make sure the area is clear of debris or low hanging branches. It should be at least 10 feet from the house.

2. Lay out your pavers in a circle in the shape and size of the fire pit you desire. They should typically be 36 to 44 inches in diameter. Once the blocks are laid out, use your edger to mark out the outside of your fire pit design.

3. Once the blocks are clear, you can use your edger to dig out the area about 2 inches down and use your tamper to level it. Using your level will help to ensure the strength of the base.

4. Using the gravel base, spread 2 inches on the tamped soil area (a rake will help make the spreading easier). Once the gravel base is laid out – tamp it down to make it level.

how-to-build-a-custom-fire-pit-tamp-paver-base.jpg

5. To ensure that the base is strong enough for your fire pit, you can wet the gravel base, tamp it, and add another ½ inch or so (and tamp it again). Always use your level to ensure that everything is even. If the base is not level you can adjust accordingly.

6. Now you can lay out your first layer of blocks on top of the gravel base – make sure the blocks are flush up against one another. You can check the blocks to make sure they are level as well and adjust accordingly.

7. When adding the second row, be sure to stagger the joints of the blocks – once the second row is laid out, remove two blocks at a time and apply construction adhesive to hold your fire pit together.

how-to-build-a-custom-fire-pit-spread-lava.jpg

8. The remaining rows are placed and cemented as the second row – staggered joints and construction adhesive to hold them in place.

9. When your rows are completed you can line the inner walls of the blocks with your fire bricks and use lava rocks to hold them in place

10. Once the fire pit is dried and completed you are ready to enjoy a wonderful night out by the fire with friends and family. Get those marshmallows ready!

DIY Scented Fire Starters:

For those of you who grow herbs in your home or garden, you can dry them and use them to create your own scented fire starter! The recommended herbs are: rosemary, sage, lavender and mint. All you need to do is dry some cuttings of your favorite herbs and once they are dry wrap them in newspaper and tie it up with some natural twine. Simply place your fire starter in the fire pit and get ready to enjoy the sweet aroma of your favorite herbs as you relax by the fire!


http://www.hgtv.com/design/outdoor-design/landscaping-and-hardscaping/how-to-make-a-backyard-fire-pit

Guide To Working With The Right Landscape Designer: Part 2

Top 4 Questions To Ask About Your Landscape Design Project

By: Lauren M. Liff for Dabah Landscape Designs

         You’ve hired a landscape designer and you're bursting with excitement as images of picturesque gardens float through your mind. The anticipation of the beauty of your completed project builds, but then your mind starts to wander. What if something goes wrong? You asked the right questions before hiring your landscape designer, but what’s next? If you’ve never worked with a landscape designer before, you want to make sure the right questions are raised during your project. Here are the top questions to ask once you’ve hired your landscape designer, before the first shovel hits the ground:

1. What are your ideas for our design? Once you have discussed your “wish list” with your designer, and they have had a chance to take a look at the property, you want to find out what their ideas are for your garden. Designers can present their designs to you in a number of ways: a collage-style mood board with pictures of plants and other features, a two-dimensional/to-scale drawing created with a CAD program, a 3D rendering or a hand drawn to-scale blueprint of the design. When the design is presented to you, make sure everything on your wish list is depicted and voice your opinion throughout the design project.

backyard.jpg

2. What is the estimated cost of our project? Finding out the estimated cost of your project is key when it comes to your budget. Since you’ve set a budget before beginning this phase of the project, you know how much you are willing to spend. Be sure to ask for the estimated cost of the design as well as the installation. You also want to ask how changes to the project during the installation will be handled – these are called “add ons”. It is important to know how add-ons will effect the total cost of the project as designed changes do often arise during the installation.

3. What can we do to reduce the cost? Hardscape installations such as pathways, patios, decks and retaining walls are typically more expensive than softscape installations (plant material). So sufficed to say, the more hardscapes in the design the more costly the project will be. Materials used for hardscape installations vary greatly for the product as well as the installation – be sure to discuss with your designer ways to reduce the cost of the project to stay within your budget. Designers will be able to provide you with options that can save you money without losing any of the creativity of the design.

4. How long will it take for the project to be completed? The time it takes for a project to go from the design phase to the installation phase and then to completion varies on a number of factors. The size and scope of the job, acquiring the necessary materials and plants, weather and other set backs all play a part in how long the project will take to be completed. There is no way to guarantee an exact completion date due to these factors, but you can ask the designer for an estimated date range for when the installation will be finished. Remember, quality designs and installations take careful planning and time. Patience is key in this process.

         Keeping these questions in mind throughout the design process will allow you to be sure-footed in your decision. You always want to be on the same page as your landscape designer to avoid miscommunications that could lead to errors in the installation process. When it comes to making sure that the professional design is what you had envisioned for your property, you want to keep an open line of communication between yourself and the designer. Asking these questions will allow you to do just that, as well as allow for a smooth design phase and an easy transition into the installation phase. 


Source

Guide To Working With The Right Landscape Designer: Part 1

Top 4 Questions To Ask Before Hiring A Landscape Designer

By: Lauren M. Liff for Dabah Landscape Design


         Transforming your property into a beautiful work of art can be an incredibly exciting endeavor and even more so if the entire process goes smoothly. When making the decision to hire a landscape designer you want to make sure you avoid any surprises that may pop up mid-project as much as possible. To avoid such instances, you want to raise the right questions prior to beginning and throughout the duration of your project. Before you even begin your search for a landscape designer, you want to make sure you know what you are looking to have done. It helps to walk around your property and write down a “wish list” so to speak, of projects you would like to have completed. Make a list of projects you yourself would like to complete and which projects you would prefer to have a professional do. Writing out your thoughts and ideas will help give you a clear sense of what you want to have done before speaking to a professional. Once you’ve found landscape designers that you would like to contact, asking the following 4 questions will make sure that you end up hiring the right person for the job.

59531_435118452082_3048215_n.jpg

1. What services do you offer? You want to make sure that the landscape designer you are thinking of hiring can provide you with the services you are looking for. Landscape designers fall into one of three categories: design only, design-build and full service design-build-maintain. Knowing what services a company offers will help you chose the one that is best suited for your project.

2. Can I see examples of your past work? If you are looking for your property to have a certain style, you want to make sure that the landscape designer has worked on other projects with that same style. You want to hire someone who can bring your dream landscape to life and have it be everything you envisioned and more.

3. Is work done in house or is it subcontracted out? It’s always good to find out who is actually going to be completing the project. Some landscape designers use subcontractors for certain aspects of the job such as hardscape installation or carpentry features. It’s best to work with a company who will be in control of every phase of the job – if the landscape designer uses a subcontractor, if that person has a problem it could throw off the entire job.

landscape+design+master+plan.jpeg

4. What is your process? A landscape designer’s process will depend on what services the company offers. Understanding the process of completing your project will allow you to know what to expect throughout the duration of your job. You also want to be honest with the designer about your budget – setting a budget up front is incredibly important because it will tell the designer not that they need to spend the entire budget, but what they can accomplish within the set budget.


         You want to find a landscape designer who can help you to bring your landscape vision to life – someone who can complete the job within your budget without skimping on the creativity. Asking these questions first will give you that leg up on your project and better prepare you for the entire process. A well-designed and maintained landscape can increase your property value by at least 20%. With an investment like that, you absolutely want to be sure you are getting your dream landscape from a design professional who will provide you with exceptional service from start to finish.


Guide to working with the right landscape designer: Part 2


Source

.sqs-block-content h1 { font-size: 80px !important; }