fire pit

How to Build Your Own Fire Pit

build-a-fire-pit-hero.jpg

DIY: Building a Fire Pit

By: Lauren M. Liff for Dabah Landscape Designs

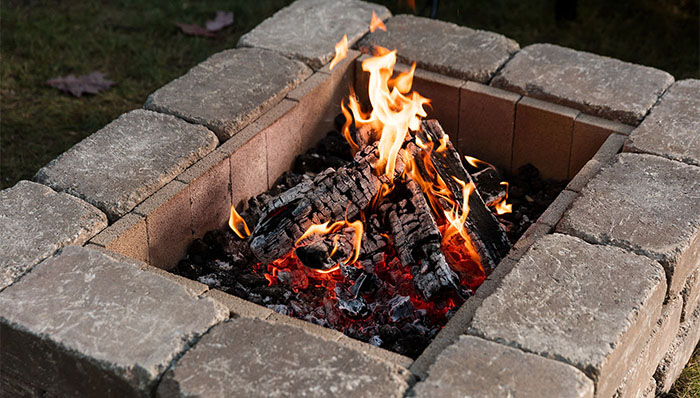
Now that you know what to consider when building a fire pit, lets talk about an easy DIY project to build one! There’s a great satisfaction that comes from using something that you built yourself, especially something as wonderful as a fire pit that. Even though it may seem small, it can make a big impact on your outdoor entertainment experience.  You can refer back to our previous fire pit post for a list of things to consider before beginning this project.


Here is what you will need:

Cast concrete wall stones

Gravel base

Construction Adhesive

Edger

Fire bricks

Level

Tamper

Steel rake


Let’s get started!

1. Pick a safe location to build your fire pit, make sure the area is clear of debris or low hanging branches. It should be at least 10 feet from the house.

2. Lay out your pavers in a circle in the shape and size of the fire pit you desire. They should typically be 36 to 44 inches in diameter. Once the blocks are laid out, use your edger to mark out the outside of your fire pit design.

3. Once the blocks are clear, you can use your edger to dig out the area about 2 inches down and use your tamper to level it. Using your level will help to ensure the strength of the base.

4. Using the gravel base, spread 2 inches on the tamped soil area (a rake will help make the spreading easier). Once the gravel base is laid out – tamp it down to make it level.

how-to-build-a-custom-fire-pit-tamp-paver-base.jpg

5. To ensure that the base is strong enough for your fire pit, you can wet the gravel base, tamp it, and add another ½ inch or so (and tamp it again). Always use your level to ensure that everything is even. If the base is not level you can adjust accordingly.

6. Now you can lay out your first layer of blocks on top of the gravel base – make sure the blocks are flush up against one another. You can check the blocks to make sure they are level as well and adjust accordingly.

7. When adding the second row, be sure to stagger the joints of the blocks – once the second row is laid out, remove two blocks at a time and apply construction adhesive to hold your fire pit together.

how-to-build-a-custom-fire-pit-spread-lava.jpg

8. The remaining rows are placed and cemented as the second row – staggered joints and construction adhesive to hold them in place.

9. When your rows are completed you can line the inner walls of the blocks with your fire bricks and use lava rocks to hold them in place

10. Once the fire pit is dried and completed you are ready to enjoy a wonderful night out by the fire with friends and family. Get those marshmallows ready!

DIY Scented Fire Starters:

For those of you who grow herbs in your home or garden, you can dry them and use them to create your own scented fire starter! The recommended herbs are: rosemary, sage, lavender and mint. All you need to do is dry some cuttings of your favorite herbs and once they are dry wrap them in newspaper and tie it up with some natural twine. Simply place your fire starter in the fire pit and get ready to enjoy the sweet aroma of your favorite herbs as you relax by the fire!

 

http://www.hgtv.com/design/outdoor-design/landscaping-and-hardscaping/how-to-make-a-backyard-fire-pit

Attention S’mores Lovers: What you Need To Know About Fire Pits

What to Consider When Planning A Fire Pit

By: Lauren M. Liff for Dabah Landscape Designs


The definition of an outdoor space is changing drastically as the years pass; it has gotten to a point where simply having a deck and a grill just won’t cut it. Backyards everywhere are becoming much more detailed and full of “accessories”. From outdoor kitchens to outdoor living rooms complete with fireplaces and detailed stonework designed to look like elegant area rugs. As backyards everywhere are being transformed, the number one fixture being implemented into almost every outdoor design is the fire pit. If you are thinking about adding a fire pit to your outdoor space, here are several things to keep in mind:

1. What is your budget? When planning the design of your fire pit, you want to keep your budget in mind. Fire pits can be all different shapes and sizes and can be made of a variety of materials; the cost of a fire pit can range anywhere from $200.00 and up. If you are building a small fire pit, you can buy the stones and dig the hole yourself or buy a simple fire pit unit from a retailer to keep the cost low. The cost can obviously get increasingly high depending on the sophistication of your fire pit.

2. Will it be permanent or portable? Are you looking for a fire pit that will become the focal point in your yard or do you want to be able to bring the fire pit along with you to a gathering? For a built-in design, the materials should match either your home or other materials in your garden so that everything can flow together smoothly. Portable fire pits come in a wide variety of materials and shapes. There are fire bowls, fire tables and also chimney-style options as well. Whatever style you chose, make sure to use to proper stones and materials for your fire pit to work safely. 

3. Will it use wood or gas? Wood and gas are the most common choices for fueling a fire pit. If you are looking for that all too familiar true fire pit smell, then wood is the way to go – just make sure your fire pit has a screen. If you don’t care if you have that smell or not, or you want a quick starter, you can go with gas or propane. Some of these fire pits have remote start capabilities. The fire from a gas-fueled pit won’t be as hot as a wood fire; you also won’t hear the crackling or get that smoke that comes from a wood fire.

4. Where will it be placed? When placing a portable fire pit, it is best to use it on a natural surface – concrete, stone, grave, or brick (for example) will work fine. Embers could fly from your fire pit and could start a fire if not placed on the proper surface. Permanent fire pits are typically built on a gravel base. The fire pit should be built so that it is proportional to the size of your yard and will allow for seating and proper air circulation. In terms of its location in the yard, most areas have a requirement that the fire pit must be at least 10 feet from the home and neighbors’ yards. Permits are sometimes needed for larger fire pits and some require a site inspection to make sure that the location is safe for a fire pit. Before building your fire pit make sure to check your local ordinances to see what is required.

Whether you decide to build your fire pit with a premade kit from a local retailer or you opt to have a landscape professional design and install it, it’s always important to plan thoroughly before beginning the installation process. When it comes to your fire pit, you want to think “safety” above all else.

Safety Tips:

1. Check wind direction before lighting a fire

2. Don’t use flammable fluids to light/relight fires

3. Don’t ware flammable clothing (nylon) or anything loose-fitting

4. Avoid using soft woods (pine/cedar) – they can “pop” and throw sparks

5. Keep children and pets at least 3 feet away from the fire

Why Should I Have an Outdoor Kitchen?

Outdoor Kitchens: What They Can Do For You and Your Property

By: Lauren M. Liff for Dabah Landscape Designs

backyard.jpg

There is no better way to spend a warm summer night than dining with friends and family on a beautiful stone patio, surrounded by the delicious smells of a home-cooked meal. Having an outdoor kitchen will let you do just that! Of course, you might ask, “Why spend the money on an outdoor kitchen?” The answer: An outdoor kitchen is a great investment, and one you will enjoy for many years to come.

The first (and most popular) reason for adding an outdoor kitchen is that it instantly converts a ho-hum backyard space into a breath-taking cooking and entertainment center. Imagine what it would be like to mingle with guests outdoors while dinner is on the grill, the sides are simmering on the stovetop, there’s more than enough space to move around, and the cook won’t have to miss out on all the fun!

Also, did you know that an outdoor kitchen could increase your property’s value? Experts agree that a homeowner who installs an outdoor kitchen can expect a return on investment from a low of 70% to a high of almost 200% percent. And that makes sense. Stainless steel grills and other modern outdoor appliances are easy to clean, and able to withstand the changing outdoor temperatures. So, your new kitchen will serve you well for many years and add to your property’s value, if—and when—you decide to sell. 

CI-Kitchen-Aid_outdoor-grill_s3x4.jpg.rend.hgtvcom.1280.1707.jpeg

Often, the first thing that comes to mind when considering an addition is the disruption (and mess) that comes with construction. For an outdoor kitchen, the transformation takes place, well, outdoors. Building an outdoor kitchen gives you that desired extra living space by using the room you already have on your back patio. Outdoor kitchens can lead to quicker cleanups and healthier lifestyles. Strong cooking odors will no longer fill your home, and grilling beats frying any day because there’s no batter coating or dripping grease.

Everyone likes to save money, right?  Well, did you know that an outdoor kitchen may help you cut your utilities bills? When you cook up a storm inside, the temperature rises, causing air conditioning to work harder than it should. Cooking outdoors will help you save on energy consumption. Want to hold on to even more money? Having your own outdoor oasis may slash your restaurant budget, too; you can enjoy a “night out” experience in your own backyard and keep your wallet in your pocket.

When you consider the decision to build an outdoor kitchen, it’s clear to see that the pros greatly outweigh the cons. Building an outdoor kitchen truly is an investment and will prove to be more rewarding than costly. The design can be customized to your budget and your needs. When your project is completed, you can sit back, relax, and congratulate yourself on a decision well made. 

https://learn.compactappliance.com/benefits-of-outdoor-kitchen/

.sqs-block-content h1 { font-size: 80px !important; }