landscaping

Gardening Tips That Don't Have A Root To Stand On

unnamed.jpg

10 Garden Myths Debunked

Many of the garden tips and tricks floating around out there have been passed down through generations, spread by word of mouth or found on the Internet. Many gardeners tend to rely on these methods and some of them are accurate and incredibly helpful, however there are a few, very common tricks that are actually big misconceptions. These misconceptions act as more of a hindrance than a helpful garden hack. Let’s expose these common garden myths and make your gardening experience a whole lot easier for next season.

1A1.jpg

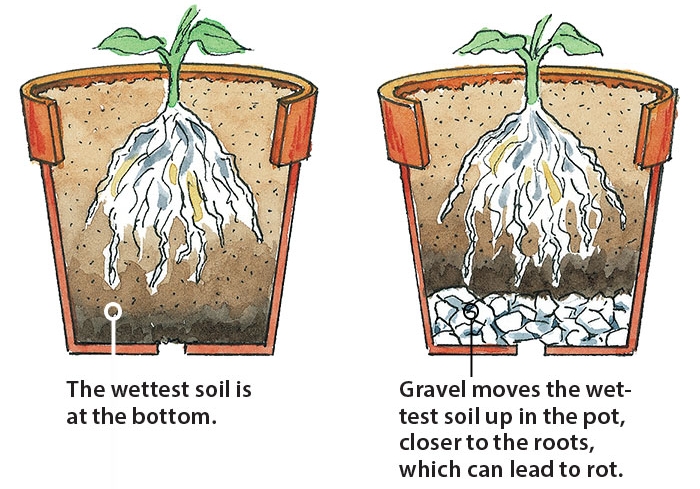
Most people believe that adding a layer of gravel or stone at the bottom of a container will help improve drainage. I have actually heard this tip a number of times and I have tried it but with no avail. The gravel you place at the bottom of your planter will actually prevent free drainage and lead to moisture collecting around the roots. To avoid the inevitable root rot and disease, use a container with a drainage hole as well as a good potting mix. It has been said that planting “smelly” plants around the outside of your garden will keep deer and other pests away. I have been struggling with keeping deer out of my garden for some time now, and I can tell you first hand that smelly plants do not do the trick. The deer are smart and they quickly learn to simply walk around the smelly plants to get to feast on your garden. Click here for some alternative methods to keep the deer from invading your outdoor space.

overfertilizer-01.jpeg

There seems to be a lot of misconceptions regarding the fertilization of plants as well as lawns. Some people believe that since a little fertilizer is good for the plants, then adding more will work better. This is incredibly wrong. Adding too much fertilizer to your plants will fry the roots as well as stunt the plants natural growth habit. Most fertilizers have a high content of nitrogen; too much will result in a lot of thick foliage but no blossoms or fruit. The excess fertilizer can also wash into the ground water, which has been causing problems for local bodies of water throughout the state. Too much fertilizer on your lawn will result in burning; your green grass will look like straw.

Many gardeners want to have a drought-tolerant garden. This is mainly due to the misconception that these drought-tolerant plants require no water. Drought-tolerant does not mean: “no water required” it simply means that the plant requires less watering than others. No matter what, all plants need regular water until the plant is well established. Certain plants do become drought-tolerant after they are established, but they still require occasional watering. Especially in the heat of summer, make sure you are watering your drought-tolerant plants moderately. When it comes to watering lawns, there are many opinions on the best time to complete this task. Most people tend to believe that watering at night will help save water and keep the grass healthy. However, if you are watering your lawn at night, the water will sit on the lawn throughout the evening and thus inviting mildew and fungal diseases. In truth, it is best to water your lawn in the morning, giving it more than enough time to dry before nightfall.

images.jpeg

Gardeners everywhere love using mulch in the garden, however most people believe that the mulch should be piled up against the shrubs to keep them healthy and protected from possible winter damage. This is also false, Mulch helps retain moisture and keeping the plant material constantly damp can lead to a number of diseases and fungus. When mulching in your garden, be sure to keep it a few inches from the trunk of your plant material. There is another misconception that sand will improve the quality of clay soil. Adding sand to clay soil will result in your soil having consistency comparable to mortar. The best way to improve clay soil is by introducing organic material, compost or finely chopped bark will do the trick. English ivy can be invasive but is not a parasitic plant, as some believe. It can grow up to 90 feet and kills other plants by blocking out the sunlight necessary for success.

Cleaning-and-protecting-garden-tools.jpg

Most people tend to believe that sterilizing their garden tools with a bleach and water mixture works the best. Bleach is actually corrosive and will gradually ruin the quality of your tools. Some alternatives are rubbing alcohol, Listerine, Lysol or WD40 – these products are relatively safe to use in small quantities. Always make sure that you sharpen and clean your garden tools regularly - this will help to avoid spreading any fungus or disease to your other plant materials. Another tip most gardeners tend to follow is that young newly planted trees should always be staked. The truth is allowing the young tree to move freely allows it to grow stronger and sturdier. If you are planting your new tree in a fairly windy spot or if the tree tends to be top-heavy, it can be loosely staked with a flexible and soft material. Make sure that the stake isn’t in place for longer than six months. 

Use the tips we have listed in this article to help avoid these common garden myths. If you are unsure of a garden hack that a friend or relative mentioned to you, a little research won’t hurt. As landscape designers, we love our gardens as much as you do! We want to make sure that your gardening experience is as relaxing, enjoyable, successful and most importantly, SAFE. We all can’t wait for the next gardening season, but keep these tips in mind and if you have any proven garden hacks or other myths to be debunked, please post them in the comment section on our Facebook.


Source

Lawn & Garden: How To Prepare For Winter

54ca73eb65f89_-_fall-leaves-rake-470-0908.jpg

Landscape Checklist For Winter Preparation

By: Lauren M. Liff for Dabah Landscape Designs

For avid gardeners, it feels as though as soon as the growing season arrives, it’s gone. For the blooms this might be true, but for your landscape as a whole, there is still plenty of time to care for it before it enters its dormant period. Preparing your lawn and garden for the cold weather is incredibly important when it comes to keeping a happy and healthy landscape. There are important tasks to complete in the fall to make sure that all plant materials are ready for that strikingly cold first frost. Take a look at the steps below to help you prepare your garden for dormancy; at the bottom of this post we have our downloadable and printable fall checklist to make your garden prep a breeze.

First you want to assess your garden. Your garden can tell you a great deal upon conclusion of the growing season. To prepare for the next growing season, first you want to assess the results of your work from this season.  Assess the overall health of your plant materials, check for diseases and damage and address accordingly. Next we begin the physical preparation – its time to clean up the garden! You should weed, deadhead faded blooms and replace any ties with jute twine The natural fibers work better over the winter because they are more flexible – they will break down over time but by the time that happens you will be needing to retie your plants anyway.

promo292884385.png

Next you can begin cleaning up your plant material. You can lightly prune dead and broken branches from your trees and shrubs but take care when pruning your flowering plants. Some plants flower on old growth (certain types of hydrangeas for example) so when you prune off the old growth, you’re actually pruning off next years buds. Spent flower heads can be pruned off but if you’re unsure of the pruning methods of a certain plant, it doesn’t hurt to look it up. Then you want to see if any of your plants have outgrown their space in your garden. If so, then they might need to be divided. If you have perennials in containers, you can remove them and trim the roots before planting them in the ground (root pruning will hem stimulate new feeder roots).

Make sure to remove any annuals or bulbs from your garden that aren’t zone hardy – be sure not to forget your containers and window boxes as well. You can save seeds from your annuals for next year. You can use cool weather annuals in your containers such as kale, pansies or garden mums. You can then add soil to the areas where plants were removed or areas where additional soil is needed. You can add compost and peat moss to replace any lost nutrients from the growing season. Add mulch to needed areas in your garden but make sure it isn’t sitting on low lying branches or pushed up the stalk of a plant.

Laying-down-mulch.jpg

The fall is the perfect time to lay down seed to fill in those bare patches throughout the lawn - the cooler weather will allow them to have a better chance at germinating and developing a strong root system before the freezing temperatures arrive. Aeration will help to break up compact soils and aid in seed germination – the two can go hand in hand. You should also apply your winter fertilizer –a slow release all-natural fertilizer will do the trick. Your lawn can store food in the form of carbohydrates during the winter season, allowing for a healthier and stronger lawn the following season.

If weeds were a concern this season (as they usually are) you can also apply a selective pre-emergent herbicide (like you did in the spring) – this will help deal with weeds that have been deposited during the summer. You can also use a spot treatment of post-emergent herbicide however most people would rather put down grass seed instead. If grass seed as been laid on your lawn do not use any weed control as this will stop the grass seed germination along with the weeds. Make sure you know the difference between selective and non-selective herbicides – a non-selective herbicide will kill everything including your lawn. Lastly, early fall is a great time to plant trees and shrubs. For some plant material suggestions and tips, take a look at our Fall Is For Planting post. Plus, nurseries and garden centers have everything on sale to help clear their shelves for the season.

Following this checklist will help you ease your garden into dormancy and allow for happier, healthier plant materials next season, as well as a cleaner garden! As the days grow shorter and the weather grows colder, gardeners everywhere dream of the upcoming growing season – so take advantage of the time you have left this year to make the most of the 2017 growing season. Come springtime, your garden will be thanking you for your love and care during the previous season. So take this list, check it twice and count the days till spring arrives. Happy gardening!


Download and print our Fall Gardening Checklist


For More Information

Chelone lyonii: Lyon’s Turtlehead

DETA-45.jpg

Late Blooming Beauty For Your Fall Garden

By: Lauren M. Liff for Dabah Landscape Designs


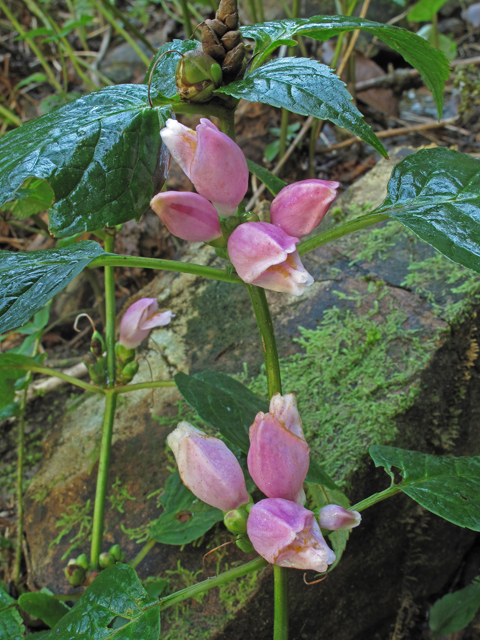
            Chelone lyonii also known as Lyon’s turtlehead or pink turtlehead is a great way to add wonderful color and a unique twist to your garden late in the season. The turtlehead’s name stems from a story in Greek mythology where a nymph (named Chelone) refused to attend the wedding of Zeus and Hera, the gods punished her by turning her into a turtle. However, I’m sure she would be honored to have such an interestingly beautiful flower named after her! The turtlehead adds seasonal interest to your garden with not only its unique blossoms but its thick foliage as well. As the flowers of summer start to fade, this beauty is just getting started.

A_C_IMG0535.JPG

            The turtlehead features rose-pink flowers set on terminal spikes piping out of thick, deep green lustrous foliage. The name “turtlehead” refers to the flowers that slightly resemble a turtle’s head, similar to the hooded flower of the snapdragon. They have pink corollas that have lower lips covered in a slightly yellow beard. The foliage is ovate and coarsely-toothed – the leaves are about 3 to 6 inches long with slender petioles, rounded bases and pointed tips.

It can grow to be 2 to 4 feet tall and is easily groomed to have a bushy habit simply by practicing regular pinching. It can also be kept slightly shorter if you pinch back the stem ends in the spring. Being deer resistant, a pollinator favorite as well as being adored by butterflies, makes the turtlehead a late season perennial favorite. When designing your shade garden, accompany Chelone with Heuchera Americana, Polystichum acrostichoides, Solidago rugosa ‘Fireworks’, Lobelia siphilitica and Conoclinium coelestinum for a true late season combo.

A_C_IMG0537.JPG

            Chelone thrives in moist soil and light shade, however it can become slightly drought tolerant once it’s established. They prefer humusy soils along with well-composted leaf mulch – this will come in handy if you are growing you’re Chelone is growing in a sunnier spot. If you are decide to plant your turtlehead in a full shade area, keep in mind that your plant is more likely to need staking for support due to its build and mature height – however if planted in optimum conditions, staking will not be needed. Chelone spreads by slowly sending out rhizomes that will form large clumps – it is not considered to be invasive but it will self-seed in moist soils. It can be propagated by division, cuttings and by seed.

            Chelone isn’t badly susceptible to most insects or diseases. It can succumb to mildew if it’s grown in soils that are kept mostly dry or if the air circulation in the surrounding area is poor – but when planted in its optimum environment Chelone can be an incredibly successful plant. It makes a great addition to shade and woodland gardens as well as bog gardens or surrounding a shaded pond. It can be used as a border plant and will make a fantastically interesting cut flower. When the weather grows colder and the bright colors of summer being to disappear, Chelone blossoms will pop and bring life back to your late season landscape. 

dsc_0554_2256.jpeg
chelone-lyonii-fl-dkausen.jpg
Turtlehead-mwms1916.jpg

Guide To Working With The Right Landscape Designer: Part 3

Top 4 Questions To Ask About Your New Landscape

By: Lauren M. Liff for Dabah Landscape Designs


Congratulations on your newly installed landscape! You asked the right questions before hiring your landscape designer and you asked the right questions during the project but now that the project has been completed, what’s next? Every landscape design client has questions regarding their new plant material and hardscapes. We believe that there is no such thing as a silly question, so ask away! As landscape designers, we want to see your new design flourish for years to come.  Here are the top questions we recommend you ask regarding your new outdoor space:

Top: Initial Installation, Bottom: 1 year later

Top: Initial Installation, Bottom: 1 year later

1. How long will it take for the garden to fill in? When a new garden is installed, the plant material used seems to look small but there is a reason for that. Designers take into account the mature size of the plant and plan for the space it needs to grow. Each plant has a different growth rate, some ornamental grasses and perennials can grow in within a single season but larger woody material such as trees and shrubs can take some time to fill in. We can say that the year following your landscape installation will absolutely look more incredible than it did when it was first installed. Be sure to ask your designer how long they believe it will take for the areas in your landscape to grow in, that way you will have an estimated timeline.

unnamed.jpg

2. How much maintenance do my new plants require? Different plants require different levels of maintenance and maintenance depends on how much time you are willing to commit to your garden. Some companies offer maintenance services which are at your disposal and if they do not offer those services, you can ask for recommendations. For “the do it yourselfers” make sure to ask about the maintenance requirements for the plant materials used on your property. Proper maintenance and care results in happy, healthy and well-established plants.

unnamed.gif

3. When and how often should I water my new plants? Similar to maintenance practices, watering routines vary from plant to plant. Some like wet feet, others prefer dry soil and some are in between. Request the watering requirements for your plant materials from your designer – this will help to ensure their success going forward. If you do not have an irrigation system, ask if they would recommend having one installed or for suggestions on alternative watering methods. Make sure to ask how often you should water – typically the best time to water your garden and turf is early in the morning and around dusk. New plants do require more water as opposed to plants that are already established.

unnamed-1.jpg

4. How do I handle weeds in my new garden? Weeds are an incredibly common problem in every garden and they can take away from the beauty of the design. You can ask your designer for recommendations on how to control them. From our standpoint, preventative measures work the best – there are pre-emergent weed control applications that you can apply in your garden (organic as well). Although it seems like a lot of work, pulling weeds out as they appear will help to keep your garden in top shape.


Working through a landscape design and installation process can be difficult…but it doesn’t have to be. When it comes down to it, asking the right questions at the right times will make all the difference! Using our simple to follow 3 part guide will absolutely make your project go smoothly and your experience much more relaxing and enjoyable. Being on the same page as your designer, not holding in any questions you might have and gaining knowledge about your landscape will help you to keep your garden in tip top shape for many years to come! 


http://www.foxnews.com/real-estate/2017/04/07/10-questions-to-ask-before-hiring-landscape-designer.html

Are Plants Ticklish?

True or False: Tickling your plants can help them grow

By: Lauren M. Liff for Dabah Landscape Designs


Almost everyone is ticklish, some people enjoy being tickled while others can’t stand it – but the truth is, that it does nothing but make us laugh. Did you know that you could tickle plants to help them grow? They won’t laugh uncontrollably right away, but their enjoyment is still just as noticeable over time. Many commercial greenhouses and nurseries tickle, stroke or repeatedly bend their plants – now, this might seem crazy at first but they are actually tapping into a natural phenomenon that impacts how plants grow. This practice of tickling and bending plants is known as thigmomorphogenesis.

Plants respond to a number of different stimuli – light, gravity, moisture levels and yes, even touch. Thigmomorphogenesis is a plants’ response to being touched. This natural process occurs when a plant is touched by any outside influence including rain, wind and passing animals. The growth rate and habit of a plant varies based on what touches it most often. For example, a tree growing in a very windy spot will change its growth habit to gain more mechanical strength. This tree will be short and have a strong thick trunk – it might also form a wind-swept shape. The tree grows this way in order to avoid being blown over in a storm.

Climbing vines are another perfect example: quite opposite to the wind-swept tree, vines will grow towards the objects that touch them. This is why vines climb up our houses, fences and mailboxes. By alternating the growth rate on each side of the stem, vines are able to traverse in almost any direction. For example: if you stroke a cucumber tendril on the same side over and over again, it will inevitably bend in the direction of the touch.

Now, you might be asking yourself why one would bother tickling a plant? Funny thing is, it can actually help your plants grow stronger! Seedlings that are grown inside tend to fall victim to etiolation. Etiolation means an excessively tall and spindly growth habit – or “leggy” as most people call it. This happens even more when they don’t get enough sunlight. When you touch, tickle or gently bend your seedlings, you are actually helping to stimulate growth. Placing a fan by your seedlings will also aid your seedlings in growing stronger – the blowing of the fan will mimic outdoor wind.

Obviously you want to provide your plants with the essentials. To ensure proper growth, always make sure to provide your seedlings and other plant material with adequate water and light. For seedlings grown indoors, you should avoid excessive nitrogen fertilizations to help prevent etiolation.  Tickling your plants, although it does sound quite silly, can prove to be an incredibly interesting experiment. With the proper care of your plants and seedlings plus some daily tickle time, you’ll end up with healthy, strong and very happy plants. Happy growing!

Oh Deer! My Garden Is A Buffet!

How To Keep Deer Out Of Your Garden

By: Lauren M. Liff for Dabah Landscape Designs

When I was a child, I adored Bambi just like every other girl I knew. Now as a landscape designer and avid gardener, I find that sweet little Bambi is a destructive creature that devours my landscape each year. As deer populations continue to increase and as more land is being developed, New Jersey residents share in my frustration towards this nuisance pest problem. Deer will eat just about anything vegetative and boy do they eat a lot – and comparable to humans, they become less picky about their menu the hungrier they are.

The average adult male deer can consume more than five pounds a day! So, how do you keep deer from turning your backyard into their new favorite restaurant? The key to keeping deer out of your garden begins with early intervention. Taking preventative measures before the deer move in will prove for better results and keep your hosta safe. There are several different methods of organic and natural deer control to help you protect your landscape when the herd begins moving through.  

The most natural form of deer control is planting specific flowers that deer have been known to specifically avoid. If you are designing your garden and you know that deer are a concern in your area – take the safe route and plant deer resistant plants. Colorado State University says that plants such as Rudbeckia, Daffodils and Virginia creeper. If you are designing your garden and you know that deer are a concern in your area – take the safe route and plant deer resistant plants. Although deer do steer clear of certain plants and there are those that deer do not typically chow down on – keep in mind that if they are desperate enough or if food is sparse, they will eat just about anything. 

Another method of deer control is by using fencing or netting in or around your garden. Fencing is probably the best solution to your deer problems however it is not the most aesthetic and can become pretty pricy to build and install. Typically a deer-proof fence is about 8 feet high and is made of woven wire. It is possible to get away with a shorter fence being that deer are opportunistic feeders as they tend to avoid barriers especially if there is alternative food source. Netting is a safe and humane way to keep the deer out – it works best for small trees. It allows for sunlight and rain but protects them from those pesky deer. 

There are also devices that you can use in your garden to repel the deer and prevent them from wanting to come back to dine on your arborvitae. You could try using a motion-activated sprayer for example. When the device is triggered it shoots out a cold blast of water – the sudden noise and unexpected spray will scare any foraging animal and at the same time teach them to avoid the area in the future. Another option is using an ultrasonic device. This device emits a noise that the deer can’t tolerate. The deer will react negatively to this sound similar to how we would react to someone scratching their nails on a chalkboard – they simply can’t stand it!

Lastly, if those methods do not work or you’d prefer to try a different tactic, there are always deer repellents. Deer repellents can be a spray, dust, granule or anything left around your plant material to keep the deer away. Everyone has a different opinion on which deer repellent is most effective and honestly the best way to find out which one works best in your garden is by trial and error. Deer can also become less deterred by a repellent overtime so what used to work could become less effective over time – this can be remedied by switching up your repellents year to year.

Repellents can range from a bar of scented soap that you hang near your plants to sprays containing the urine of predators (such as coyotes). There also homeowners who make their own deer repellent; there are a huge number of recipes for this type of repellent, but again you have to find which deterrent works on your deer. Repellents do need to be reapplied every so often depending on the time of year and the amount of rain you receive. Some repellents work by making the plant material smell and taste bad so take care when applying it near food crops – if it tastes bad to the deer it will taste bad to you as well. 

When all else fails, or you seem to be stumped on how to keep these pesky critters out of your yard, New Jersey does have a company that uses their own patented all natural environmentally friendly deer repellent. When it comes to keeping deer from dining on your landscape plants, the struggle is very real. I’ve been fighting this battle personally for quite some time; one year the deer must have really been starving because they completely leveled my carpet roses – thorns and all (if you can believe it). Taking action before the deer cause any damage and using one or more of these methods will absolutely help keep your garden plants off the menu! 

https://www.planetnatural.com/deer-repellent/


Improving Your Garden From The Ground Up

Soil Amendments: How to Improve Your Soil

By: Lauren M. Liff for Dabah Landscape Designs

            Now that you’ve done your at-home soil pH and texture tests, let’s talk about how we can improve your current soil conditions. The healthier your soil is, the happier your garden plants will be – the amendments you make to your soil of course will depend on what type of soil you have. Using the results from your soil tests we can figure out how to adjust the pH level and how you can improve issues like drainage or lack of organic material.

            As we discussed in the soil test post, there are 4 main types of soil: loam, clay, sand and silt. IF you have loamy soil then there isn’t much you need to do in terms of amending it – just simply keep doing what you’re doing, but regular applications of compost or other organic materials will help your soil to maintain this texture. If you have mostly clay soil, your available nutrients are plentiful however you struggle with drainage – leaving your plants sitting in water. If you have mostly sandy soil, the presence of available nutrients is most likely pretty low and you struggle with water retention as it drains far to quickly. If you have silty soil, it tends to get slimy when it’s wet and drainage is a concern but the presence of available nutrients is high.

            Looking at your soil textural triangle, or the jar from your DIY soil test, you can tell which particle is most predominant. Improving your soil does take time and can be difficult but it is possible by taking the proper corrective measures and with the use of the right amendments.

For sandy soils:

1. To help with water retention you can use well rotted manure or compost (grass clippings, humus and leaf mold as well) – these will increase your soils ability to retain water, they also will work the fastest.

2. You also have to keep an eye on salt levels – if you have a seaside garden then chances are your soil already has a pretty high sale content – in this case make sure you are only using plant based amendments such as plant based compost or sphagnum peat (they have the lowest salt levels).

3. The nutrient content in sandy soils tends to be low, you can test your soil to see what nutrients are lacking and use fertilizer to address those concerns accordingly.

For silty soils:

1.  With silty soils your concerned with drainage and the fact that the roots are not receiving the optimal amount of oxygen. You can use composted manure or vegetable matter or ground/aged pine bark to improve the aeration and drainage.

2. Apply 2 to 4 inches of the organic material and work it into the soil about 8 to 12 inches down (into the root zone) for best results.

 For clay soils:

1. Use compost or other materials that will compost quickly (such as well-rotted manure, leaf mold and green plants) Apply 3 to 4 inches of the organic material on the soil and gently work it into the soil, go down about 4 to 6 inches.

2. Pay attention when watering your plants, if your soil is mostly clay the water will sit on the soil and some plants can’t tolerate wet feet.

3. Builder’s sand and gypsum will also help improve the drainage and break up some of the compaction – make sure you use course sand rather than fine sand because that will only make things worse.

4. Core aeration will also assist in breaking up the compaction by pulling out tiny plugs of dirt that will sit on the ground and disintegrate naturally.

            After completing the DIY soil pH test, you now have a rough idea of what the pH level of your garden soil is. There are two options when it comes to addressing soil pH levels: you can either use plant material that thrive in acidic or alkaline soils (depending on your results) or you can use amendments to lower or raise the pH level. Most plants do well in soil with a pH level between 6.0 and 6.5. Adding organic material to your soil is helpful in adjusting the pH level as well because it acts as a buffer – protecting your soil from becoming either too acidic or too alkaline. But there are other amendments you can use to further adjust the pH level of your soil.

Lowering the pH level:

1. If your soil is too alkaline, the phosphorus in your soil will be less available to your plant materials resulting in less fruiting and flowering.

2. Using organic matters to address this concern is going to be your best bet – composted manure and vermicompost will release the phosphorus that is tied up in your alkaline soil- the use of pine needles as mulch will also naturally increase the acidity in the soil.

3. Sulfur can be used to lower the pH level in your soil and make it more acidic. This is the product used for turning hydrangeas that beautiful bright pink color.

4. Sulfur should be applied using the same method as lime – read the label and follow the directions. If you are using sulfur to increase the acidity in your soil, I have found that working it into the soil is the application method that shows the best results.

Raising the pH level:

1. Lime is typically used to raise the pH level of garden soil to make it more alkaline – make sure to read the label and follow the directions. Adding too much lime to your soil can be incredibly difficult to correct; it’s best to start on the lighter side.

2. You can use powdered or pelletized lime for this application; mix it in to the top layer of the soil or sprinkle it on top and water it in.  In my experience pelletized lime is easier to work with and watering it into your soil, allowing it to work gradually, seems to have the best results.

3. Before doing a lime application you want to check the magnesium content in your soil as lime will increase those levels. Too much magnesium in the soil will restrict the nitrogen availability for your garden plants.

            Amending your soil texture and pH level will greatly improve the health and happiness of your garden plants. The texture and pH level of your soil will effect the availability of the soil nutrients that plants need to grow and flourish – freeing up or adding to these nutrients will help your plants to grow to their fullest potential. Soil is obviously a key element when it comes to the health of your garden – so just as you tend to your plants, tend to your soil as well. Help your garden be all that it can be!


Amending Clay Soils

Amending Sand Soils

Amending Silt Soils

Amending pH Levels

Building A Retaining Wall? Here's What You Need To Know!

10 Things To Think About When Building A Retaining Wall

By: Lauren M. Liff for Dabah Landscape Designs


Retaining walls are incredibly important when it comes to controlling erosion or decreasing the dangers of a steep slope but they can also be used as a decorative structure to highlight or define your garden areas. They have become increasingly popular over the past few years and not only add to the beauty of your outdoor space but increase the value of the property itself. To build a successfully constructed and well-designed retaining wall, there are several factors you need to keep in mind. 

1. When designing your wall, you want to make sure that it will be incorporated into your lifestyle. Retaining walls are now being used to create multi-level garden areas or multi-use outdoor spaces. You want to make sure that your retaining wall enhances not only your outdoor space but your lifestyle as well.

2. Get creative with the design of your retaining wall; it’s important to remember that when it comes to transforming your landscape, the possibilities are as endless as your imagination. A retaining wall with a curve is more interesting than a straight line. A garden hose or a large rope can be used to help you layout your retaining wall design – then use a shovel to mark it out. 

When planning the construction of your retaining wall, there are two main factors you need to consider:

3. Size definitely matters when building a retaining wall. Walls that are 4 feet and under in height can be easily designed and built without thinking too much about structure. For larger walls, structure is important because you don’t want it to collapse; you will also need to check your local building regulations as permits might be required for the construction of a wall more than 4 feet in height.

4. Plan for drainage; a wall that has a slope dropping towards it will need added drainage at its base. To allow for drainage you can install a fabric-covered drainage pipe and some gravel at the base (the fabric will keep the pipe from becoming clogged).

Leveling and grading are incredibly important when it comes to constructing a retaining wall:

5. If you are building your retaining wall up a steep slope from a lower grade you will need to gradually step up the retaining wall to achieve a greater slope. Think about terracing, you essentially want to turn your one steep slope into several more level areas slightly resembling a staircase. This will allow you to be able to maneuver the slope safely and the newly created level areas can then be used for planting.

6. Keeping your wall and the surrounding area level is incredibly important as it will ensure that your wall is not only well balanced but sturdy as well. Before building your wall make sure to level out the space and as you continue to build the wall be sure to check that each block is level – this will also give your wall a consistent look.

How long your wall will last and how sturdy it is both depend on how well constructed your wall is:

7. Creating a solid base is key because this will set the tone for your entire project. When creating the base you want to dig out a trench several inches below grade and tamp it (compact it) to ensure that it is level. Then you add gravel and tamp it as well before constructing your first row.

8. Backfilling your wall provides support for your structure. When you complete a row of blocks, backfill with gravel and tamp it – remember that every row must be level. You want to do this all the way up your wall; when you are about 3 inches from the top of the wall you can backfill with soil so that the gravel is not seen.

The style of blocks you use should flow with the design and atmosphere of your outdoor space:

vintage-2.jpg

9. Using manufactured blocks and stones are easier when it comes to uniformity and stability. Since no stone is exactly the same, make sure to color match and space out stones that are uneven in color to create a consistent look. You can also use natural stone to build your wall, it might not be as easy to work with but there is such beauty in a creatively designed natural stone wall. 

10. Cap blocks will provide your wall with the necessary finishing touch. You can use masonry adhesive to secure the cap blocks to the top row of your wall to hold them in place. This will give your wall a clean finished look – much like adding edging to a garden bed or paver patio.

Installing a retaining wall can allow you to organize your garden areas in the most elegant way. A well-designed retaining wall can completely transform your property and a well-constructed one can stand the test of time. Following these pointers will allow you to design and construct a retaining wall that has both stability and beauty. 


http://www.diynetwork.com/how-to/outdoors/hardscape/10-things-you-must-know-about-retaining-walls-pictures

.sqs-block-content h1 { font-size: 80px !important; }