Cooking Outdoors

MaryF-Kitchen-Patio-02-HALF SIZE.jpg

In warm weather no one likes working in a hot kitchen.  Even with air conditioning, it often just doesn’t seem all that comfortable.

 And who doesn’t like the taste of fresh-grilled food?  Cooking over an open flame gives food a flavor that you simply can’t produce in an indoor kitchen.

 There are several options for setting up your outdoor cooking area. 

 The best way to cook is with a full outdoor stainless steel kitchen.  You can install many of the amenities that you have indoors so you can make a gourmet meal to eat on your patio.  It’s a great way to entertain too.  If your home uses natural gas or propane, your built-in grill could be hooked up to your existing gas lines to avoid refilling a portable tank.

 Just think about what you could do with all of these:

                Barbecue Grill                                  Refrigerator

               Sink                                                    Storage cabinet

               Storage drawers                             Trash bin

               Bluestone work area                     Beverage dispenser / tap

 Your kitchen could be installed under a pergola or pavilion for protection from the sun and weather.  Lighting would let you work after dark.

Outdoor seating, fire table and a small kitchen under a pergola

Outdoor seating, fire table and a small kitchen under a pergola

 A less expensive option is a simple kitchen.  Select a couple of items from the list above or just install a grill.

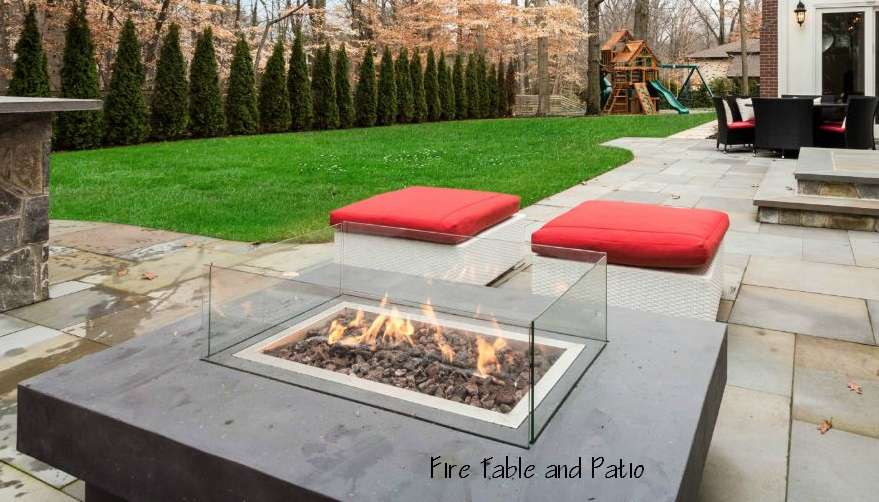
 If you just want a place to relax, you can mimic a campfire using a fire pit or upgrade that concept to a fire table.  These are really great for socializing on warm summer evenings.  Have a sip of hot cocoa, wine or some beer, or hang with the kids while toasting marshmallows.

6-1k.jpg

 If your patio needs upgrading, now would be the time to do that so you would be the talk of the town.  Finish it up with some outdoor furniture and a sound system and you will have your own private heaven.

 We’ve won awards for our masonry and outdoor kitchens.  See what we could do for you.


The Drought-Resistant Garden

With climate changes due to global warming, our weather patterns have changes.  Once the spring showers stop, we now have summers with high temperatures and little rain.

 When plants are faced with dry conditions, they release a hormone that causes a chain reaction and ultimately closes the plant’s pores, stopping the loss of moisture.  Some plants are better at this than others.  Scientists are attempting to create a commercially-viable synthetic version of this hormone, but until they do, we will have to either provide artificial sources of water or rely on plants that are naturally drought-resistant.

sage plant burpee.jpg

 Another option is bio-engineered plants.  There are plants being developed by cross-pollinating popular plants with versions that are more drought-resistant.

 There are a few ways that plants deal with dry conditions.  Knowing which conditions exist in your area will make it easier to select plants that will survive and even thrive. 

 Some perennials evade periods of drought by halting all growth during times of drought.  Some species have deep roots along with the ability to maintain growth, even in times of drought. And some plants have the ability to store water in their leaves and stems such as cacti and succulents.

 Some general hints to help your plants make the most of their situation are:

  • Keep plants closer together. This reduces bare ground around the roots and allows the plants to shade each other. The close plantings will hold in more moisture.

  • Use mulch. This absorbs any morning dew and reduces evaporation of ground moisture.

  • Shade your plants. Place your plants in an area shaded during the hottest parts of the day or put up a structure that reduces or reflects sunlight, but does not hold heat.

  • Protect your plants from the wind. A steady breeze will evaporate a lot of moisture from the plants and the ground.

 Whatever your situation, we will be able to help you select plants that will thrive in your environment.

Jersey Tomatoes

Who doesn’t love a ripe, juicy tomato?

Plant_400.jpg

 We have to say that the best tomatoes are grown right here in New Jersey.  The state is famous for them. New Jersey’s nickname is “The Garden State” and despite all the jokes, we do have a lot of farmland.  Our climate and soil is ideal for growing tomatoes. 

 Tomatoes became an important crop because of logistics.  Tomatoes that ship well typically are picked early or are varieties that won’t bruise easily.  These often have little flavor.  Add the fact that most of the giant commercial farms are located in California and you find that the bulk of tomatoes in the store are simply not worth buying. 

 We are near the metropolitan areas of New York City, Philadelphia, Wilmington, down-state Connecticut and New Jersey itself.  Every county in New Jersey is considered an urban area so there’s a large market within a relatively short distance.  We literally have millions of people within 200 miles just waiting for those juicy fruits.

 And yes – Tomatoes are fruits and not vegetables.


Hybrid vs. Heirloom

By definition, heirloom tomatoes are varieties that have been grown for at least three generations while avoiding cross-pollination from other varieties.  Hybrid tomatoes are created by growers who cross-pollinate multiple varieties to bring out their best traits in one tomato.  (Do not confuse “hybrid” and “GMO.”)

 Hybrid tomatoes may be developed to improve taste, durability for shipping, drought tolerance, higher yield, disease resistance and other desirable traits.  They tend to be consistent in size, color, shape and the time it takes to produce fruit.  Pollination has to be controlled to retain those traits.  If it is not controlled, subsequent generations of the plants often lose the traits bred into them and they may even produce sterile seeds. For the home gardener who likes to keep seeds to plant the next year, this can be a difficult task.

 Popular hybrids are

  • Beefsteak: Ramapo, Patio, Better Boy, Big Boy, Early girl

  • Plum: Plum Regal, SuperSauce, Juliet, Shimmer Hybrid

  • Cherry: Sungold Hybrid, Sweet Million, Cherry Bomb, Napa Grape, Sweet Mojo

 Heirloom varieties are produced through “Open Pollination.”  This means that the plants are pollinated by insects and will produce the same traits generation after generation.   This makes it easy for the home gardener to save seeds for next year and expect the same quality as in the original plants.  However there may be variety with in size, color, shape and the time it takes to produce fruit.  Many people prefer heirloom varieties since they often have superior taste to hybrids and they are normally less expensive to purchase.

 Popular heirlooms are

Cherokee Purple_400.jpg
  • Beefsteak: Pink Brandywine (this author’s favorite,) Cherokee Purple, Mortgage Lifter, Mr. Stripey, German Johnson, Yellow Zebra

  • Plum: San Marzano, Roma, Principe Borghese, Red Plum

  • Cherry: Black Cherry, Bumblebee, Lemon Drop, A Grappoli D'Inverno


Determinate vs. Indeterminate

Determinate varieties will produce their fruit within a period of a couple of weeks.  Plants put out blossoms and then tomatoes will appear.  This will determine the entire harvest.  If you want a large number of tomatoes all at once, choose determinate varieties.  This is great for canning.

 Indeterminate varieties will produce tomatoes as long as the weather allows.  The more you pick, the more new shoots and blossoms will appear.  You will have tomatoes all season long.


So get ready for summer.  Now is the time to start your plants indoors for an early harvest!

Spring Bulbs, Summer Landscape

aa--Bloodroot.jpg

It might not quite feel like spring yet – with all the snow we’ve had in the past few weeks, but believe me, it’s right around the corner!

If you have spring bulbs, you may have already seen them sprouting from the frozen ground before they were buried by the snow.  Soon there will be crocus, tulips, daffodils and hyacinths everywhere.  You may also see some of the less common spring blooms such as fawn lilies, bloodroot, winter aconite, leopard’s bane and fritillaria.

Once the early flowers are gone, you should take a look at how well your existing plantings survived the winter and decide which improvements you want to schedule for this year.

This is the best time to make changes if you’re thinking of selling your home this year or just improving the look.  Making changes early in the year gives your new plantings time to fill out for the summer and be well-established for next winter.  These improvements increase curb appeal along with the overall value of your home.

If you’re not sure what to do, we can come out and offer suggestions based on the layout of your property, tree coverage, hills, wet spots, soil type, zoning laws and anything else that might impact your property.

Here are a few things to think about:

  • Landscape design & installation
  • Garden design (flower, vegetable, fairy, butterfly, Japanese, Zen, etc.)
  • Outdoor kitchen
  • Masonry (walkways, stairs, patios, wall)
  • Carpentry (decks, stairs)
  • Tree house
  • Kid-friendly environment
  • Outdoor lighting
  • Water features (fountains, ponds & waterfalls)
  • Fire pits, fire tables & fire places
  • Pergolas & gazebos
  • Fencing

We are known not only for our landscaping, but also for our superior masonry and outdoor kitchens.

See examples of our work below:

01-Kitchen.jpg
02-Shrub-flower bed.jpg
03-Patio stone rect.jpg
04-water fountain.jpg
05-Walkway circles.jpg
06-front steps.jpg
07-Fire table.jpg
08-Fence-flowers.jpg
09-Masonry.jpg
10-Patio fancy.jpg
11-Arbor.jpg
12-Deck.jpg
13-Fence.jpg
14-tree+house.jpg
15-Stones in woods.jpg
16-Fountain.png
17-Kitchen-2.jpg
18-Fire pit.png
19-Lighting 1.jpg
20-Pond.jpg
21-Patio colors.jpg
22-Masonry wall.jpg
23-Veg garden.jpg
24-Waterfall.png
25-Tree house 2.png
26-Patio irregular.jpg
27-Lighting 2.jpg
28-Pergola.jpg
29-WATERFALL+WITH+LIGHTING.jpg

Gardening Tips That Don't Have A Root To Stand On

unnamed.jpg

10 Garden Myths Debunked

Many of the garden tips and tricks floating around out there have been passed down through generations, spread by word of mouth or found on the Internet. Many gardeners tend to rely on these methods and some of them are accurate and incredibly helpful, however there are a few, very common tricks that are actually big misconceptions. These misconceptions act as more of a hindrance than a helpful garden hack. Let’s expose these common garden myths and make your gardening experience a whole lot easier for next season.

1A1.jpg

Most people believe that adding a layer of gravel or stone at the bottom of a container will help improve drainage. I have actually heard this tip a number of times and I have tried it but with no avail. The gravel you place at the bottom of your planter will actually prevent free drainage and lead to moisture collecting around the roots. To avoid the inevitable root rot and disease, use a container with a drainage hole as well as a good potting mix. It has been said that planting “smelly” plants around the outside of your garden will keep deer and other pests away. I have been struggling with keeping deer out of my garden for some time now, and I can tell you first hand that smelly plants do not do the trick. The deer are smart and they quickly learn to simply walk around the smelly plants to get to feast on your garden. Click here for some alternative methods to keep the deer from invading your outdoor space.

overfertilizer-01.jpeg

There seems to be a lot of misconceptions regarding the fertilization of plants as well as lawns. Some people believe that since a little fertilizer is good for the plants, then adding more will work better. This is incredibly wrong. Adding too much fertilizer to your plants will fry the roots as well as stunt the plants natural growth habit. Most fertilizers have a high content of nitrogen; too much will result in a lot of thick foliage but no blossoms or fruit. The excess fertilizer can also wash into the ground water, which has been causing problems for local bodies of water throughout the state. Too much fertilizer on your lawn will result in burning; your green grass will look like straw.

Many gardeners want to have a drought-tolerant garden. This is mainly due to the misconception that these drought-tolerant plants require no water. Drought-tolerant does not mean: “no water required” it simply means that the plant requires less watering than others. No matter what, all plants need regular water until the plant is well established. Certain plants do become drought-tolerant after they are established, but they still require occasional watering. Especially in the heat of summer, make sure you are watering your drought-tolerant plants moderately. When it comes to watering lawns, there are many opinions on the best time to complete this task. Most people tend to believe that watering at night will help save water and keep the grass healthy. However, if you are watering your lawn at night, the water will sit on the lawn throughout the evening and thus inviting mildew and fungal diseases. In truth, it is best to water your lawn in the morning, giving it more than enough time to dry before nightfall.

images.jpeg

Gardeners everywhere love using mulch in the garden, however most people believe that the mulch should be piled up against the shrubs to keep them healthy and protected from possible winter damage. This is also false, Mulch helps retain moisture and keeping the plant material constantly damp can lead to a number of diseases and fungus. When mulching in your garden, be sure to keep it a few inches from the trunk of your plant material. There is another misconception that sand will improve the quality of clay soil. Adding sand to clay soil will result in your soil having consistency comparable to mortar. The best way to improve clay soil is by introducing organic material, compost or finely chopped bark will do the trick. English ivy can be invasive but is not a parasitic plant, as some believe. It can grow up to 90 feet and kills other plants by blocking out the sunlight necessary for success.

Cleaning-and-protecting-garden-tools.jpg

Most people tend to believe that sterilizing their garden tools with a bleach and water mixture works the best. Bleach is actually corrosive and will gradually ruin the quality of your tools. Some alternatives are rubbing alcohol, Listerine, Lysol or WD40 – these products are relatively safe to use in small quantities. Always make sure that you sharpen and clean your garden tools regularly - this will help to avoid spreading any fungus or disease to your other plant materials. Another tip most gardeners tend to follow is that young newly planted trees should always be staked. The truth is allowing the young tree to move freely allows it to grow stronger and sturdier. If you are planting your new tree in a fairly windy spot or if the tree tends to be top-heavy, it can be loosely staked with a flexible and soft material. Make sure that the stake isn’t in place for longer than six months. 

Use the tips we have listed in this article to help avoid these common garden myths. If you are unsure of a garden hack that a friend or relative mentioned to you, a little research won’t hurt. As landscape designers, we love our gardens as much as you do! We want to make sure that your gardening experience is as relaxing, enjoyable, successful and most importantly, SAFE. We all can’t wait for the next gardening season, but keep these tips in mind and if you have any proven garden hacks or other myths to be debunked, please post them in the comment section on our Facebook.


Source

Lawn & Garden: How To Prepare For Winter

54ca73eb65f89_-_fall-leaves-rake-470-0908.jpg

Landscape Checklist For Winter Preparation

By: Lauren M. Liff for Dabah Landscape Designs

For avid gardeners, it feels as though as soon as the growing season arrives, it’s gone. For the blooms this might be true, but for your landscape as a whole, there is still plenty of time to care for it before it enters its dormant period. Preparing your lawn and garden for the cold weather is incredibly important when it comes to keeping a happy and healthy landscape. There are important tasks to complete in the fall to make sure that all plant materials are ready for that strikingly cold first frost. Take a look at the steps below to help you prepare your garden for dormancy; at the bottom of this post we have our downloadable and printable fall checklist to make your garden prep a breeze.

First you want to assess your garden. Your garden can tell you a great deal upon conclusion of the growing season. To prepare for the next growing season, first you want to assess the results of your work from this season.  Assess the overall health of your plant materials, check for diseases and damage and address accordingly. Next we begin the physical preparation – its time to clean up the garden! You should weed, deadhead faded blooms and replace any ties with jute twine The natural fibers work better over the winter because they are more flexible – they will break down over time but by the time that happens you will be needing to retie your plants anyway.

promo292884385.png

Next you can begin cleaning up your plant material. You can lightly prune dead and broken branches from your trees and shrubs but take care when pruning your flowering plants. Some plants flower on old growth (certain types of hydrangeas for example) so when you prune off the old growth, you’re actually pruning off next years buds. Spent flower heads can be pruned off but if you’re unsure of the pruning methods of a certain plant, it doesn’t hurt to look it up. Then you want to see if any of your plants have outgrown their space in your garden. If so, then they might need to be divided. If you have perennials in containers, you can remove them and trim the roots before planting them in the ground (root pruning will hem stimulate new feeder roots).

Make sure to remove any annuals or bulbs from your garden that aren’t zone hardy – be sure not to forget your containers and window boxes as well. You can save seeds from your annuals for next year. You can use cool weather annuals in your containers such as kale, pansies or garden mums. You can then add soil to the areas where plants were removed or areas where additional soil is needed. You can add compost and peat moss to replace any lost nutrients from the growing season. Add mulch to needed areas in your garden but make sure it isn’t sitting on low lying branches or pushed up the stalk of a plant.

Laying-down-mulch.jpg

The fall is the perfect time to lay down seed to fill in those bare patches throughout the lawn - the cooler weather will allow them to have a better chance at germinating and developing a strong root system before the freezing temperatures arrive. Aeration will help to break up compact soils and aid in seed germination – the two can go hand in hand. You should also apply your winter fertilizer –a slow release all-natural fertilizer will do the trick. Your lawn can store food in the form of carbohydrates during the winter season, allowing for a healthier and stronger lawn the following season.

If weeds were a concern this season (as they usually are) you can also apply a selective pre-emergent herbicide (like you did in the spring) – this will help deal with weeds that have been deposited during the summer. You can also use a spot treatment of post-emergent herbicide however most people would rather put down grass seed instead. If grass seed as been laid on your lawn do not use any weed control as this will stop the grass seed germination along with the weeds. Make sure you know the difference between selective and non-selective herbicides – a non-selective herbicide will kill everything including your lawn. Lastly, early fall is a great time to plant trees and shrubs. For some plant material suggestions and tips, take a look at our Fall Is For Planting post. Plus, nurseries and garden centers have everything on sale to help clear their shelves for the season.

Following this checklist will help you ease your garden into dormancy and allow for happier, healthier plant materials next season, as well as a cleaner garden! As the days grow shorter and the weather grows colder, gardeners everywhere dream of the upcoming growing season – so take advantage of the time you have left this year to make the most of the 2017 growing season. Come springtime, your garden will be thanking you for your love and care during the previous season. So take this list, check it twice and count the days till spring arrives. Happy gardening!


Download and print our Fall Gardening Checklist


For More Information

When Should You Plant Trees & Shrubs?

Unknown.jpeg

It's True Folks, Fall Is For Planting!

By: Lauren M. Liff for Dabah Landscape Designs

In the world of gardening, there is a huge misconception that the leaves changing color and the temperature dropping signals the end of the growing season. This is false; the growing season doesn’t end until the plants enter their dormant period. What most people don’t know, is that it is actually more beneficial for your trees and shrubs to be planted in the fall as opposed to the spring. Planting your trees and shrubs in the fall gives encourages them to establish a stronger root system before the heat of the next summer.

100032050.jpg.rendition.largest.ss.jpg

Fall technically begins late in September – the best time to plant your trees and shrubs is about six weeks before the first sign of a hard frost. September through November is the perfect time for planting because even though the air is getting cold, the ground is still warm. This allows the root systems to become more established before the dormant period resulting in a stronger and healthier plant for next season. With the cooler temperatures and the increase in precipitation, less watering is required and there is no need to worry about damage from the summer heat. The stable air conditions also allow for rapid root development; rather than focusing all its energy on foliage or flower production, the tree puts its energy into establishing a stronger root system and in storing nutrients for dormancy.

These fall plantings will become better equipped to handle summer heat and drought due to their strongly established root system. From a designer perspective, being able to see a plants fall interest before putting it into the landscape is always a plus. There are some species you should avoid planting in the fall however, broad-leaved evergreens such as rhododendrons, azaleas, boxwoods and hollies require extra care through the winter months. They will need protection from winter winds and should be treated with an anti desiccant. We also recommend that you stick to zone hardy plant material – Schip laurels for example, don’t tolerate winter winds very well at all, the key is to plant them where they can be guarded (for example, as a foundation planting where the house combats the wind).

1452647823537.jpeg

When planting in the fall, there are three things you should keep in mind. Make sure to plant high, the soil will settle leaving your tree or shrub susceptible to root rot or disease. Don’t amend the soil around your new planting – you want to allow the roots of your new tree or shrub to grow into the native soil. With the amended soil, the roots are more likely to experience reduced growth resulting in a smaller root system and a weaker plant. We suggest you break up any clumps in the soil and remove any rocks to allow the root system to travel as it pleases. Make sure to add mulch to your new planting. You can use around 3 inches of mulch or organic matter around your plant. The organic matter should be shredded leaves or ground bark/nuggets. Adding this layer will help protect the root system during the cold weather and allow for better water retention.

If you’re looking to plant a tree this fall, here are some species we recommend: maple, spruce, pine, crabapple, linden, elm, hackberry, hawthorn and honey locust. Planting these trees and shrubs this fall will prove for healthier, happier and hardier plants for the next growing season. Studies show that trees and shrubs planted in the fall, when compared to those planted in the spring, have a more established root system and stronger overall health. A strong root system leads to a strong plant! You should also keep in mind that garden centers and nurseries are trying to clear their stock for the season – who doesn’t love a good discount? 

Happy-gardening.jpg

Chelone lyonii: Lyon’s Turtlehead

DETA-45.jpg

Late Blooming Beauty For Your Fall Garden

By: Lauren M. Liff for Dabah Landscape Designs


            Chelone lyonii also known as Lyon’s turtlehead or pink turtlehead is a great way to add wonderful color and a unique twist to your garden late in the season. The turtlehead’s name stems from a story in Greek mythology where a nymph (named Chelone) refused to attend the wedding of Zeus and Hera, the gods punished her by turning her into a turtle. However, I’m sure she would be honored to have such an interestingly beautiful flower named after her! The turtlehead adds seasonal interest to your garden with not only its unique blossoms but its thick foliage as well. As the flowers of summer start to fade, this beauty is just getting started.

A_C_IMG0535.JPG

            The turtlehead features rose-pink flowers set on terminal spikes piping out of thick, deep green lustrous foliage. The name “turtlehead” refers to the flowers that slightly resemble a turtle’s head, similar to the hooded flower of the snapdragon. They have pink corollas that have lower lips covered in a slightly yellow beard. The foliage is ovate and coarsely-toothed – the leaves are about 3 to 6 inches long with slender petioles, rounded bases and pointed tips.

It can grow to be 2 to 4 feet tall and is easily groomed to have a bushy habit simply by practicing regular pinching. It can also be kept slightly shorter if you pinch back the stem ends in the spring. Being deer resistant, a pollinator favorite as well as being adored by butterflies, makes the turtlehead a late season perennial favorite. When designing your shade garden, accompany Chelone with Heuchera Americana, Polystichum acrostichoides, Solidago rugosa ‘Fireworks’, Lobelia siphilitica and Conoclinium coelestinum for a true late season combo.

A_C_IMG0537.JPG

            Chelone thrives in moist soil and light shade, however it can become slightly drought tolerant once it’s established. They prefer humusy soils along with well-composted leaf mulch – this will come in handy if you are growing you’re Chelone is growing in a sunnier spot. If you are decide to plant your turtlehead in a full shade area, keep in mind that your plant is more likely to need staking for support due to its build and mature height – however if planted in optimum conditions, staking will not be needed. Chelone spreads by slowly sending out rhizomes that will form large clumps – it is not considered to be invasive but it will self-seed in moist soils. It can be propagated by division, cuttings and by seed.

            Chelone isn’t badly susceptible to most insects or diseases. It can succumb to mildew if it’s grown in soils that are kept mostly dry or if the air circulation in the surrounding area is poor – but when planted in its optimum environment Chelone can be an incredibly successful plant. It makes a great addition to shade and woodland gardens as well as bog gardens or surrounding a shaded pond. It can be used as a border plant and will make a fantastically interesting cut flower. When the weather grows colder and the bright colors of summer being to disappear, Chelone blossoms will pop and bring life back to your late season landscape. 

dsc_0554_2256.jpeg
chelone-lyonii-fl-dkausen.jpg
Turtlehead-mwms1916.jpg
.sqs-block-content h1 { font-size: 80px !important; }